THE WORKSHOP – DIY 1/6 shotgun by Paul Benson

Well this is a first. As I worked on getting the Paul Benson penned (Mouse9090 on many-a-forum) MK2 Square workshop together for today, to my pleasant surprise I received a SECOND tutorial from him without warning a few moments ago. As the 2nd was practically ready to post, I decided to go ahead and toss it up! I’ll post Pauls 1st(now 2nd) tutorial early next week! 

Thanks Paul for going above and beyond, I really appreciate it! 

– Knives

SHOTGUN BANG, WHAT’S UP WITH THAT THANG?
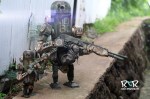
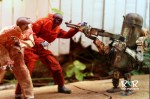
I like the shotgun that comes with the ThreeA Grunt, but I wanted to make something a bit more compact, something for close contact, maneuvering in tight spaces, ‘breaching’ etc.  I went for the ubiquitous side-by-side doubled barrelled shotgun.
For equipment I’ve made for figures before, they tend not to be completely scratch built and I tend to use bits from my 1/6 kitbash ‘bits box’ where possible.  For this shotgun I would need a trigger with guard as they are a pain to make as I’ve learned before.  I know it is a double barrelled shotgun, but a single trigger will suite just fine for firing both barrels.
 
The main tools I used are shown below.
The little saw is the best thing I ever bought for this kind of work.  Nail files are really useful, they give you a flat surface to work on.  I also use various grades of sand paper and emery paper.  The glue, as shown, is a thin super glue that can be obtained from Games Workshop vendors. The great thing about it is, it comes with a little brush inside which gives you loads of control.  Over balsa wood it can be painted with the brush to give you a really hard surface to work with further.  Super glue is also a really good filler for narrow gaps.  Rather than craft knives I use scalpels. Blades can be changed very easily and come in lots of shapes.  Although I have fine drills, very often I use a small pointed scalpel blade to made small holes by simply rotating the blade.
STAGE 1
In the planning stage I looked at a bunch of shotguns online for reference and to get a feel for the variety of design and the detail in the engineering.  What I end up with sometimes turns out a little different to how it started in my mind. Which is fine, it’s often just a bit of trail and error.
I did find a section of a rifle with trigger and guard in my bits box and a shoulder stock (which I ended up not using!).  Got together the ‘strip styrene’ (it is called this by the firm that make it, ‘Evergreen Scale Models) which I thought I might use.  I also used some sheet styrene not shown.
STAGE 2
Some in progress pieces are shown below.
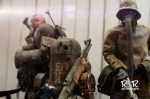
The two barrels were made from 5mm styrene tube.  They were glued together and thin strip of 3mm semi circular styrene, turned over and glued along the top.  As shotguns often break to load, I cut off a 4 mm section of the barrels to make the housing for the firing pin mechanism. The two short tubes making this section were then filled with 3mm styrene rod.
The part of the rifle from the bits box, that included trigger and guard, was cut to receive the first part of the barrels as a first fit.  I did not set out to make an engineered masterpiece and therefore it will not actually hinge, but as you can see in the next picture, further shaping of this section and the front stock has shown where the barrel could pivot.
The back stock is 10mm by 6mm rectangular hollow section styrene to which I have glued small pieces of sheet styrene to block it in.  An alternative stock could easily have been made of balsa wood.
The front stock is two pieces of 6mm by 2.5mm rectangular solid section styrene glue together and cut into the stock shape.  Along the bottom edge a strip of 3mm semi circular styrene was glued. I added a front sight and strikers, using 1mm sheet, cut and shaped with scissors.  Further sanding down and filling was done to complete the model and scratches were added to the front and back stock to give the impression of wear and tear.
STAGE 3
The shotgun was then washed in detergent to remove any grease marks and then sprayed with matt black acrylic paint.  I have never seen the need to buy an air brush and always use Humbrol acrylic aerosol paints to a give a base colour.
I tend to use Games Workshop acrylic paints which are very good and are easy to get hold of, either at a local store or online. They come in a range of both basic and very useful blended colours. They are kind to brushes as there is no need to use solvents for cleaning.  The names of the paints, I might as well use them, are referred to below.
The next stage was to paint the stocks.   I did this by dry brushing, a technique that would hopefully leave the wear and tear scratches darker. Dry brushing is a technique of wetting a brush with paint and then almost drying it with paper towel, then wiping it across the area you are working on. Keep going until you get the effect you need.
Firstly, I used Games Workshop Scorched Brown, then GW Dark Flesh, then GW Desert Yellow and finally GW Desert Yellow mixed with a little bit of GW Skull White.  The metal parts are dry brushed with GW Boltgun Metal.  Where surfaces might be more worn than others, more drybrushing can be applied.
A tether added for good measure and you’re good to go!
We hope you enjoyed this episode of The Workshop. Thanks Paul putting together for us. Now get out there and customize something!

We’d love to hear from you and check out what kind of customs you’re working on! Send us a shot of your latest custom work with a brief discription to radtoyreview@gmail.com. 

Hit us up on Facebook or Twitter pages to stay updated whenever we post new Workshops and epic toy reviews!

Until next time!


Wednesday’s Wallpaper of the Week

Today is Wednesday so of course we bring you Wednesday’s Wallpaper of the Week! You might be asking yourself why we keep featuring 3A’s Grunts figures on this site. There are two specific reasons for this..

A. Well, frankly we can’t get enough of them…

and B. Just look at how COOL this shot is from Winged Yeti!

I love everything about this image! I love how clean and focused it is. It really shows off what’s so great about the EMGY colorway. The inclusion of the two Tomorrow King botheads is perfect as well. Thanks Jared, for putting together this week’s sweet exclusive wallpaper!

Now I’m off to rearrange my display to match this setup…


click on your desired screen resolution to download!

“King Emgy” by  Winged Yeti

KingEmgy 1024x768

KingEmgy 1280x800

KingEmgy 1920x1200

See ya next week!

Let us know how we’re doing! Follow us on Facebook and Twitter and stay updated!

*review* WWRp JEA Marine MK3 Bertie

I’ve been downsizing my collection of WWRp for the past year. This is mainly due to space. My WWRp collection shares the same shelf, nay the same real estate (highly sought after and increasingly limited) I have at my disposal for my Action Portable Tomorrow Kings. That plan was emphasised even more when the Yellow Hornets 4 pack, De Plume 2 and De Plume 3 packs came in. Those automatically almost doubling my collection and has left me.. space-less. Edge to edge, there is absolutely no where to put even a single additional 1/12 figure.

Turns out, unless you are tied to the linear this-is-how-it’s-meant-to-be-and-thus-MUST-be type of collector/enthusiast thought process.. having no more available space on your WWRp shelf shouldn’t cause you stress when considering a single WWRp Mk3 Bertie or even three.

I’ll explain myself in a bit, but first…

PACKAGING

The box Mr. JEA arrived in is very reminiscent of his bigger (MUCH bigger) brothers. A few simple graphical embellishments and a rasterized photo of the figure. It’s a very clean presentation, if a bit unexciting.

WHAT’S INCLUDED

MK3 Bertie comes with only a few accessories. A gaggle of bags and a very cool sawed off shotgun make up the lot of it. The bags themselves are really well made, being stiff enough to hold their shape and feature some really nice contrasty panels. The shotgun is an impressive looking weapon right out the box. Even at 1/12th, the reaction you’ll have is probably going to be very much like what it was when/if you saw the 1/6th version … you’ll find yourself saying, “Damn, now that’s a big gun”.

THE BREAKDOWN

Well, I had a plan for this shoot. I wanted to take my new WWRp Mk3 Bertie and some of his buddies out into some nearby woodsy areas and take some cool photo’s where JEA would look right at home. It was going to be the best shoot yet!

I’m glad I opened him before making the trek, because right off the bat it became clear that someone at the 3A factory had forgotten their super glue the morning my toy was born. The front bag clip had fallen out. Luckily it fell right back into the box I’d just taken it out of or I’d probably lost it in the dust bunnies and fur balls currently inhabiting my living room floor.

So instead of a jungle trek, I settled on the stoop right outside my front door. Also note that for most of the shots, I left the front hook off for fear of dropping and losing it mid shoot. If you like, just try to imagine Bertie wearing a giant fanny pack in the photo’s he’s lacking it in.

OK, back to business. Here’s the MK3 Bertie all kitted up and ready for serious business.

A refresher. MK3 Bertie is the next level/upgrade of the MK2 Bertie. You may see the naming logic there. While the MK2 Berties (who ran around on tiny legs and stood roughly the same height as their human compadre’s) carried a bevy of mini guns, pistols and machete’s/severed heads; the MK3 Berties only have two options: A and B. Mode A come toting the massive shotgun you see JEA with above, while Mode B (click here for a peak) have two ridiculous (aka awesome) shoulder canon’s. So you might hear adjectives like “big” and “massive” tossed around quite a bit when one refers to an MK3. I’m still trying to imagine what a shotgun blast from a shotgun that size would do to.. well, anything.

Out of the box and on the ledge, the first thing I noticed about this guy is just how well done the paint app is on him. I may sound like a broken record here because amazing paint is something 3A can generally do with their eye’s closed (something they unfortunately might have tried last year with the zomb 2.0… ZING!) and I’ve praised it in almost all my reviews. Still, the first MK3 Bertie out the gate aims to please with the quality being right up there with the OG Berties and Brambles. He’s a little grimier but every bit as detailed and awesome looking as his big brother as well. There are a ton of random pops of rust and colors sprinkled all over him that really keeps your eye moving around. There’s parts rusted in one color that didn’t carry over to other parts, breaking up the look even more. It has in spades two of the key things that pulled me into 3A in the first place, a great robot design with amazingly realistic weathering. At this scale it’s pretty astounding how much they were able to cram in there without him appearing muddy, dull or overdone. I dig all the decals too.. yes, even the little black circles/spots.

The articulation is on par with other “cylinder” bots in the 1/12 family (also identical to the 1/6 MK3). Basically his body is made up of several swivel joints with the bulk of actual usable articulation being in his arms and hands. One thing I LOVE on my 1/6 MK3 Berties are their hands. They’re just so easy to get great gestures with. In 1/12th the general idea is the same, but my Bertie’s fingers seemed pretty loose, not tiny-Dropcloth-finger loose, but looser than any of my other WWRp Berties, Brambles or Armstrongs. It’s a minor gripe and not as extreme as the afore mentioned Droppy’s limp digits as well as an issue you may not experience, but it is a gripe all the same. What’s important though is that he can still hold his shotgun well enough without having to worry about it slipping out of his hands at the slightest bump.

The one thing that bothers me about Mk3’s in general is that there really are only so many poses you can do with them. As I mentioned a second ago, all the articulation is in his arms and hands. Waving, pointing, throwing gangs signs and flipping off the camera are par the course with them. Once loaded up with his shotgun, you get yourself a handful of other ways to set him. Pointing the gun, at ease with the gun, resting on the gun, shouldering the gun, using the gun as a golf club, etc etc. But once you’ve exhausted those, you’re done. Set and forget.

Still, just like the MK2 Berties the articulation is completely appropriate here.  A necessary evil courtesy of one of my favorite Ashley Wood bot designs. So I guess that it’s not so much a knock against it but rather a comment on how much more time I spend messing with my other more poseable toys on the shelf. I think on some level I’m just waiting for the Mk4 or another bot (like Caesar?) to come along that’s just as playable as my APTKs or Droplcoths are.

You remember those bags I was saying were so well made at the beginning of this post? Well, now comes the part of the review where I tell you how much I hate them. Yes, they’re well stitched and crafted. Yes, they look really nice with the contrasting colors, working zippers and stitching. Yes, a WWRp De Plume WILL fit in the front fanny pack if need be. These are all obvious positives. What I hate is the way they “attach” to Berts body. You will literally knock these bags off your Bertie  exactly three dozen times a dozen before you even get him from box to shelf. They FLY off. At times lunging for the floor while simultaneously becoming invisible. Sometimes seemingly on their own accord, one will go spinning across the floor behind a dresser impossible to retrieve, lost forever.

And why wouldn’t they? They’re hanging on an absolutely miniscule hook by little, worthless loosey goosey bag loops.

My 1/6 MK3’s bags fall off occasionally, but I think their size alone gives them enough heft to stay put 90% of the time. These wee bags weigh almost less than air. A sincere breeze could probably knock them off. I think I’m going to try and hunt down a spare belt strap from a 1/6 figure of some sort and see if I can fashion a belt similar to the old MK2 style belt. Kick the fanny pack to the curb. I think I like the look better without it anyway.

And that leads me to my final thoughts and the point where I try to make my ramblings in the intro about shelf space a little more crystal. I’m not saying that shelf space won’t be an issue with these guys at all. That they somehow become a negative entity that will equal in space savings to what they are to their ocularly apparent physical dimensions. No.

I’m just saying that unless you really can’t let your food touch, you have quite a few options as to where you can stick this guy… aaannnd that sounded dirtier than it should have.

In WWRp (1/12 scale) he’s the biggest bot on the block. It looks cool and it’s the intended fit.

But check this out, put a 1/6 square next to him and..

Not bad, huh? Almost meant to be. Now look at him hanging out with Jung De Plume and Jungler Grunt. It’s like hes’ made to be there. He’s may no longer be the biggest and baddest but it works pretty damn well, I’d say. Also, posed up next to these guys, his shotgun is almost to a feasible scale.

But where I think the real money might be… facing him off against a horde of Zombs.

(ed’s note: two zombs = horde today)

All we need now is an official (or unofficial) Warbot in that scale and we’ll be good to go. You can put this guy just about anywhere in your collection, wherever you have a bit of free space and he should fit right in.

One thing to keep in mind however is that not all mixing and matching of toy scales will give desired results…

…or does it?

There’s something of a nostalgic factor to the MK3 Bertie. The second I opened him I found myself filled with many of the same feelings and thoughts I had when I first opened my WWRp MK2 Jea Bertie almost two years ago.

“Wow, he looks great.”

“Sweet paint and weathering.”

“Check out that gun.”

“Cool, you can pose the fingers!”

But there was one thing notably missing. The thrill I normally feel when I get a new 3A toy.

It took me a few drafts of this review to figure out why that was. You see, even though I just got him today there’s very little about him that is actually new to me. Not only is he simply a smaller scale version of a toy I’ve had for about 8 months, he’s essentially the same as the first 3A bot I ever purchased. Same articulation, same paint, very similar overall appearance. Overall MK3 is a bigger version of more of the same. You decide whether that’s a good or bad thing.

FINAL SUMMARY

So ends my waxing and waning about WWRp MK3 Bertie JEA. Other than being pretty much a smaller version of a toy I already have, I didn’t find much to grumble about. He compares extremely favorably to his larger brother, so if you have one of those you have a good idea of what to expect. I do wish the bags were on a belt strap or simply had a tighter fit to the clips so they wouldn’t jump to their deaths every 5 seconds. Also the limited amount of articulation is starting to become more and more apparent to me even if it doesn’t detract from the character of the piece at all. Berties are still cool. I may be slimming down my WWRp collection but I’m really glad I picked this guy up. In fact, I regret not also snagging Night Watch mode B when he was available. (Actually I regret selling my entire WWRp NW collection early last year, but that’s a story for another day). The new Berties are just as much fun as the old and I believe thanks to their size, a bit more versatile in where and how you can display them in your collection or play with them in the neighborhood sandbox.

GALLERY

*review* WWR Emgy Grunt

*review* WWR Emgy Grunt

Fedex must have known how much I was anticipating getting this guy. I usually don’t see their trucks until 4pm or so, but today he showed up at 9:30 am on the money. Thank you, kindred driver of ye olde … Continue reading