

INTRO: It’s been a little while since the last one so I’m very excited to be able to share with you today an all new Workshop! It comes from someone who’s no stranger to the halls of Rad Toy Review. Yes, Paul Benson is back with another great Workshop for those of you out there hungry for knowledge. Get ready to learn a few tricks and techniques that can help you squeeze the most out of your custom toy builds! Paul told me this workshop is more of a “tweaking” of a figure than a full on custom, but when I looked over it, I was blown away by the various techniques he uses to achieve the final figure. There’s a lot of great things going on here that you’re bound to learn something. If you have any questions about any part of the process, don’t hesitate to comment and we’ll get back to you with an answer as quickly as possible. Happy tweaking! – Knives
I don’t think I can describe this workshop as the putting together of a custom figure, it is possibly more about tweaking a figure! In my mind a custom figure is put together from completely new and scratch built parts, very little of it is from one particular original figure.
Tweaking is something I am completely into! Buying a figure and then putting it straight on the shelf is great, but it is also possible to make it a bit different. For me, that might involve adding a few bits of equipment, swapping out clothing, adding a different headsculpt and/or painting bits a different colour. Perhaps creating a different character. So, that is what I have done here, having taken a ThreeA TK and ‘tweaked’ it!
Hopefully folks who want to tweak and/or customize figures and have not done so before might find one or two things useful in this workshop.
The Starting Point
Usually when I tweak a figure, I tend to have a think about the backstory before starting, particularly if he is going to be a new character. In this case, I tried to think of what the TK is all about, how he will be equipped and how I want him to look whilst still fitting into the Ashley Wood Popbot Universe. Of course, that is going to be influenced by which TK (or whatever kind of) figure you have to work with. More often than not I start with a full figure and take away from and/or add to it via my “bits box”. My bits box is box of spare parts and clothing I’ve accumulated from various sources for custom projects.
So, since I’m using a TK for this tweak, I have to think on the types of things TK’s are known for. TKs are genetically bred, autistic warriors made for war against robots!
So the idea I had for a starting point for this one is a specialist weapon TK, a ‘bot smasher’, ‘a cleaver of bots’, ‘a smasher of robotics’ and so on and so forth. I reckon he might just have to have a ‘hammer’ for that job. Medieval knights had a war hammer, which was typically a heavy steel toothed head with a vicious spike on the reverse mounted onto an oak or steel haft. A blow from the toothed sided head would at least stun an opponent allowing for a second more powerful strike to be made. The spike was especially effective at piercing plate armour. Samurai also had a bludgeoning weapon called a Tetsudo.
Just to add an extra element, I thought TK could have a mechanical false arm, a result of a battle injury, which would be useful to add further substantial damage.
The Process
You can tackle these types of projects in many different ways but this being my workshop, my example… I’m going outline this in the order I did it.
A KDA TK seemed like a good base figure. One came available on a BST so I grabbed him.

So, what to keep and what to replace?
The body, headsculpt, right hand, belt and pouches/bags would be kept, unchanged. The shoes and left hand would be swapped. The T-shirt, sword and scabbard would be changed. Other parts from the bits box would be added.
The T-Shirt
I thought it would be cool to have the false arm and some of the equipment painted orange and as I had decided to change the artwork of the T-shirt, that ought to be orange too.

As said above the T-shirt is from the KDA TK. I removed the original artwork by peeling it off. It’a bit of a laborious job and although not possible with all ThreeA clothing, it worked well enough on this T-shirt. Just to say, brand new blank T-shirts are available out there e.g. KC Designs can do these in various fits, designs and colours.
The artwork I wanted to use is from a piece of Ashley Wood art, edited, recoloured and resized on Photoshop. The TK symbol is from a photograph of another TK’s T-shirt.

I have an inkjet printer so the artwork was printed onto opaque iron-on T-shirt transfer paper for dark fabrics. As these sheets are A4, getting lots of 1/6 artwork on them is not a problem. This gives an opportunity to experiment and get it exactly right. One thing I’ve been known to try is to iron the transfers onto old full size T-shirts just to test and see how they’ll look before I commit them to my custom! Doing so prevents you from ironing on some art onto your ONLY spare ⅙ tee, just to find that it looks less exciting than you thought it would. I won’t explain how the iron-ons work as iron-on transfers generally come with easy to follow instructions.

¨ FIGURE 3, 4, 5 and 6
Once ironed on, the transfer can sometimes look a bit glossy. What I do in this case is to make a little paper mask with an opening the same size as the artwork and spray with a matt varnish. The mask stops the matt varnish going on the T-shirt material, which does not look good.
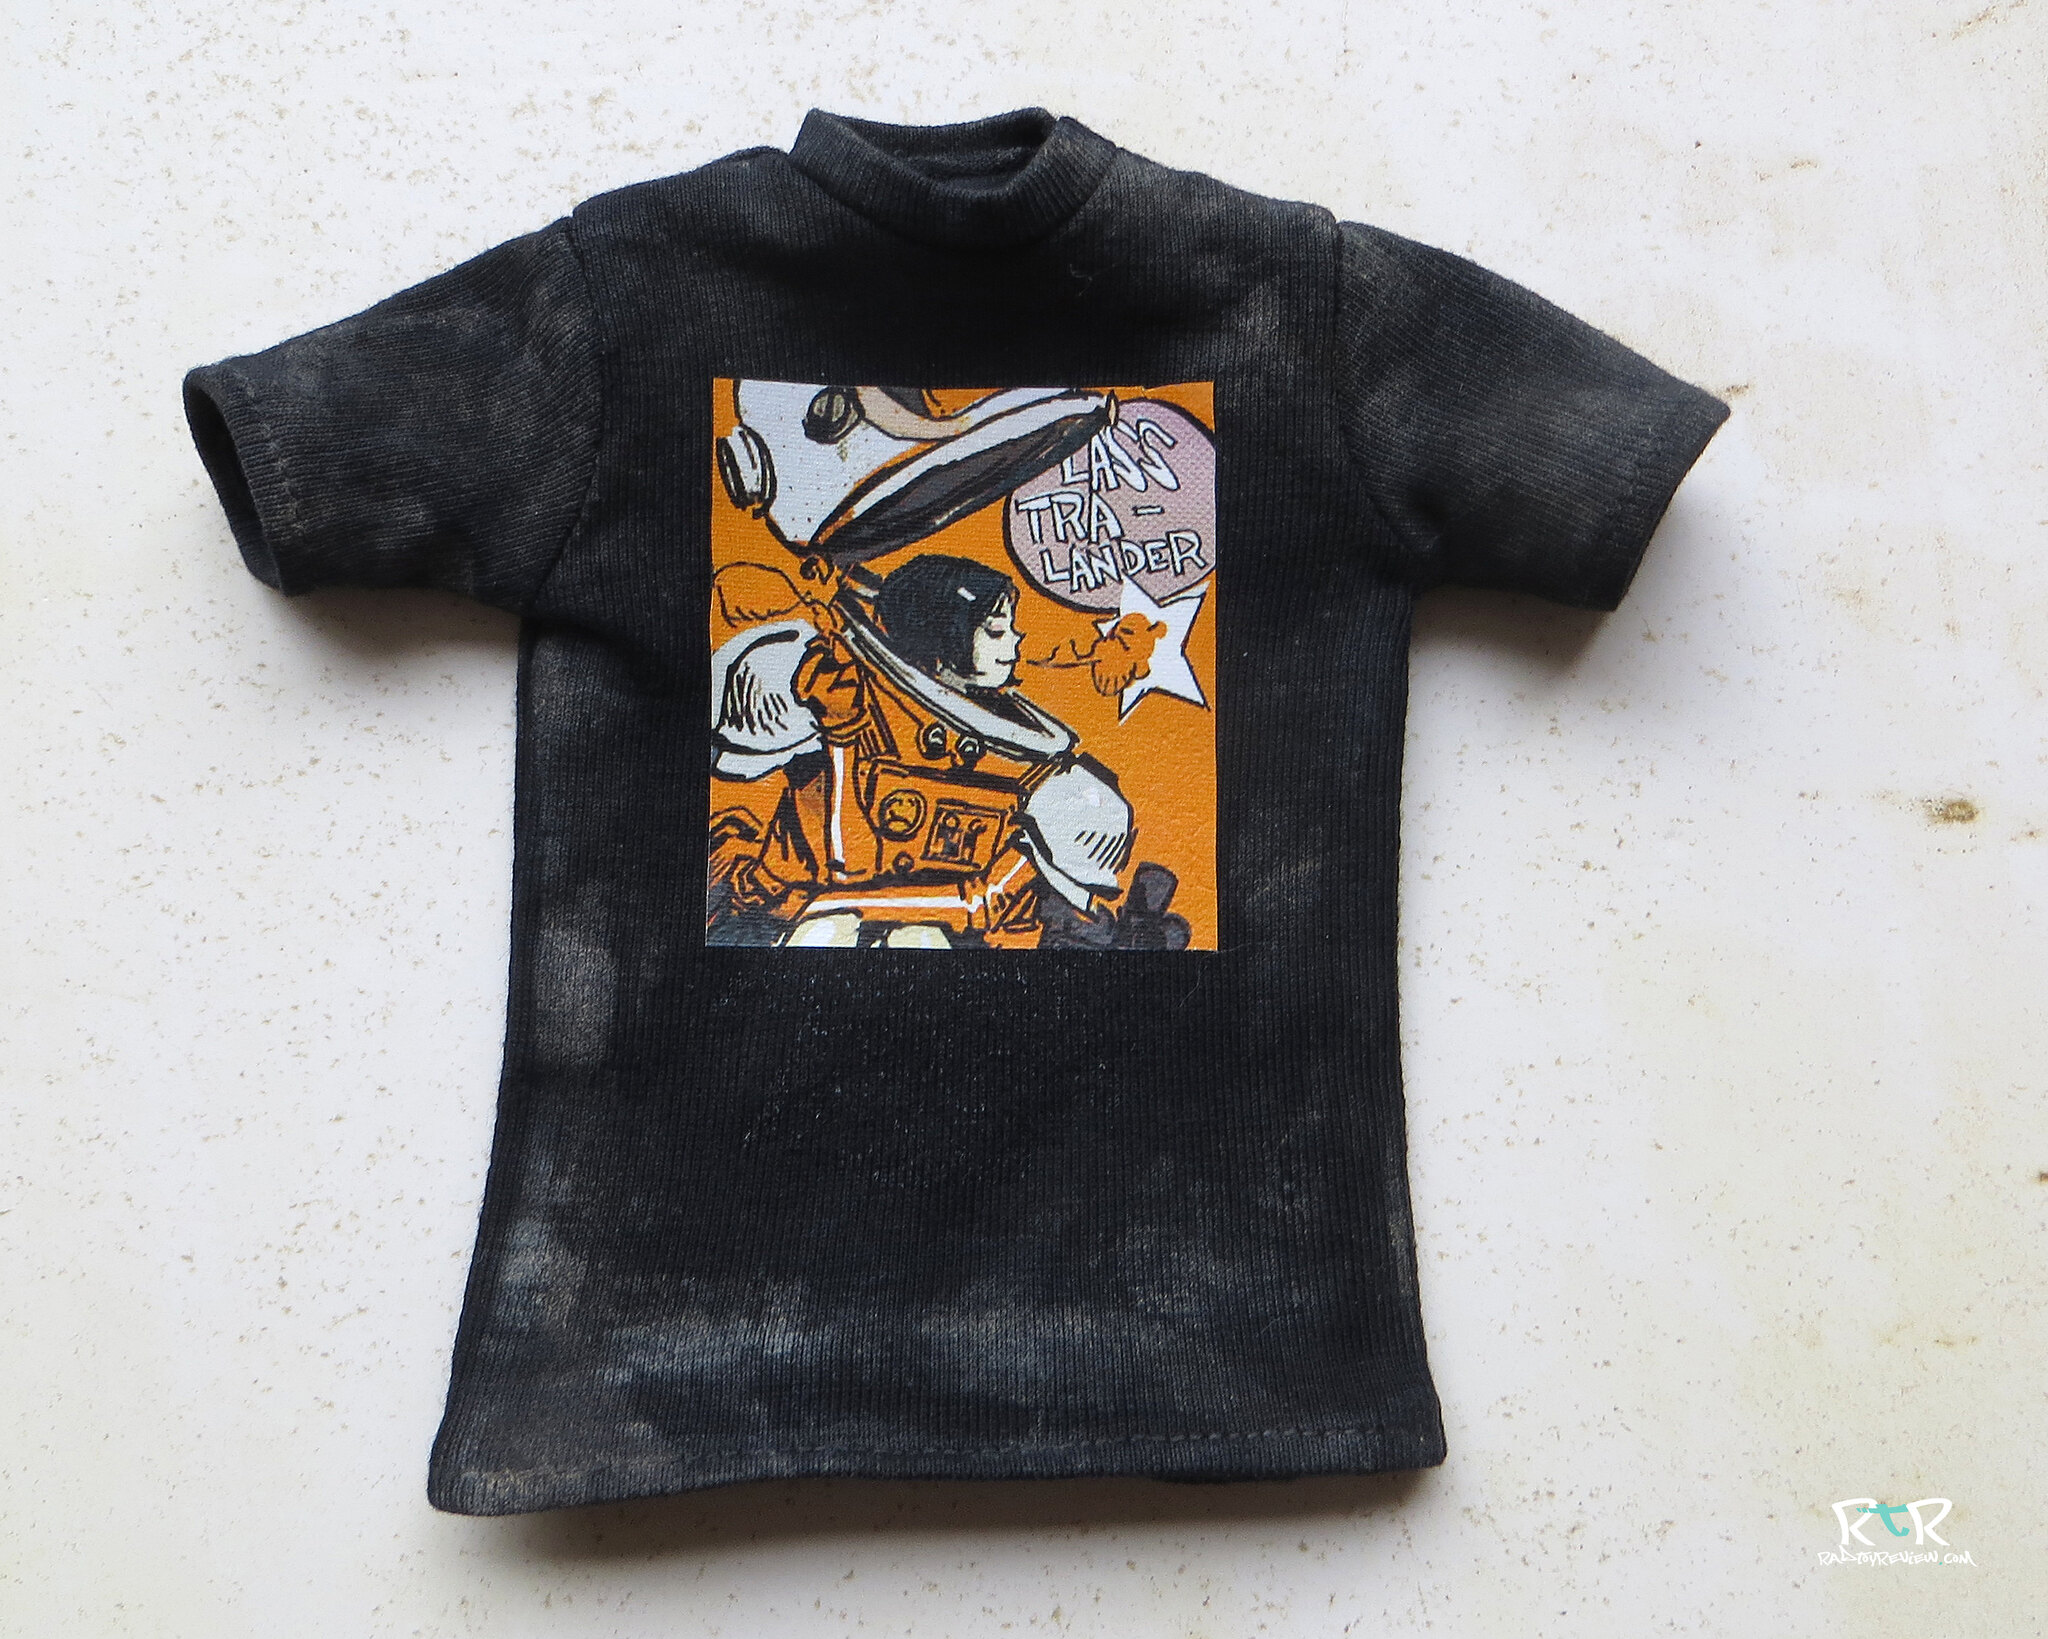
Now to weathering the T-shirt, this is how I did it, although other paints and weathering pigments will do the job just as well. My trusted technique involves using MIG weathering powder Gulf War Sand and white acrylic paint (wherever paints and inks are mentioned, I use Citadel acrylic paints and ink washes). I just mixed some of the powder, with a little paint to act as a binder and to lighten it slightly, dry the brush off a little and work backwards and forwards over the T-shirt gradually building up the effect until it looks right. For the artwork, I dirtied these with a little burnt sienna ink mixed with black ink.

The Arm

The hand came from the bits box, not sure whether it was from a ThreeA Zombot or F-Legion figure. The first job was to make it fit the TK’s left forearm, which involved cutting the wrist peg a little shorter and widening the hole in the forearm. Having done that I rounded off the edges on the hand with a nail file and some fine grit sandpaper. I drilled some holes with a Dremel and various sized drill bits. I tried to make the hand/forearm look more mechanical by using various thicknesses of cut styrene rod, a little watch part and a googly eye glued in place with Super Glue.

The forearm, upper arm and hand were then sprayed with grey primer. When dry these parts were painted a mid orange. The elbow joint was left grey. The fingers were painted black. To weather the arm, a wash of mid brown and black was applied to all parts to give an overall dirtying effect. Excess paint was wiped away.

Paint chips were painted on with dark grey and oil runs and marks with thin black paint and ink. At this point the full arm and hand were sprayed with an acrylic matt varnish. If this is not done before using metallic paint the metallic effect is lost as the paint is dulled and silver paint just looks grey. Most, but not all the paint chips were then painted in with silver paint to represent wear through to the metal. Finally just to finish off the fingers and thumb, they were drybrushed with silver using a fine haired brush and then a coarse haired brush to add a few scratches.

The Equipment and other Bits
I really like the idea of tweaking figures by just adding bits of equipment; if done well, it can really add to the story and helps to make the character that much more interesting. The way I do this is usually to raid the bits box and see what I have already from previous customs and what can be used to make new equipment/items. Sometimes I can overdo this process and end up with bits I don’t use as they don’t look quite right on the figure, as I did a few times with this one!
So, I will just briefly describe how I made the following bits.

The Hammer
The shaft is a piece of wood dowel which came from a previous custom. I knew it would fit a TK hand and would work perfectly. Not quite sure where the bright silver main part came from. I drilled a hole through it for the shaft. Both ends of the shaft were shaped to a point.
Yes, the spike is a screw, totally not sure at the time whether this would work and look right. In real life, it would probably be very effective if it was spinning round, in terms of the damage it could do! After final painting I thought it worked out alright.
The head of the hammer is a piece of balsa wood (soft wood) shaped with a saw, craft knife and sandpaper. I discovered a while back, that if you use balsa and other softer woods, they can be hardened by painting over them with Super Glue. If you do this twice and then sand down until smooth you can get a really good, hard and smooth finish.

The top of the shaft is a piece of square section styrene rod.
All parts are glued together again with Super Glue.
The yellow rivet heads are made with, I kid you not… ‘Puffy Paint’. Really! Picked this tip up from a military model vehicle workshop a few years back. The paint is in a soft plastic bottle with a narrow opening. Takes a bit of control to get the same size rivet heads, but basically you just squeeze the bottle and the paint comes out as a little blob which you apply to your surface. It hardens over a couple of hours.
To paint, I just masked over the shaft and sprayed matt black. The hammer was then drybrushed with silver and the rivets picked out with silver. To add a bit of weathering I used a mid brown mixed with a little orange and painted into joints and round the rivets where rust might have occurred.
Water bottle
Just a piece of shaped Milliput (a two part epoxy putty that dries hard). The cap is a piece of cut dowel and the wire loop is cut from a paper clip. More or less painted in the same way as the arm. Weathering was applied by stippling dark brown and grey using a small bit of rough sponge.
Bamboo Flute
I actually made this for a previous custom figure and thought a TK ought to have a flute for the downtimes when he is not ‘making war against bots’!
I used some pictures of a traditional Japanese bamboo flute as reference. Just a piece of styrene tube made to look like bamboo by wrapping thin strips of masking tape around it at regular intervals. These were painted over with Super Glue to keep them in place. Finger holes were carefully drilled out by rotating a pointed craft knife. The end of the flute was cut at an angle for the mouthpiece and half filled with a shaped piece of balsa wood. The whole thing was then primed white and painted a pale yellow/brown colour. To represent wear and age, it was sponge stippled lightly with dark brown paint.

Grenades
I went with a couple of standard ThreeA grenades which I painted a black stripe on and applied a bit of extra weathering. I made another couple from metal cam fixing dowels from some flat pack furniture and cut styrene tube of the correct diameter. The metal parts were painted black and wiped just before the paint was completely dry. The orange parts were painted in the same way as the water bottle.
Anti-robot mine
Have to admit, not quite sure where this came from, but it was in the bits box so, fair game! Added a handle using a bit of bent styrene rod. Painted as with previous equipment.
Equipment belt hooks
As it says really, this is used to hang some of the equipment on his belt. I made the ‘s’ shaped one from a bit of paper clip. Sprayed black and stippled with brown and silver paint. I also used a 1/6 D-ring, not shown.
Short Sword (tantō)
I basically made this as a cut down ThreeA katana. The sword was shortened with a modelling saw and reshaped with a nail file and sandpaper. The scabbard was shortened to fit the sword. A small rectangular piece of styrene sheet was glued to the open end and shaped to fit with a nail file and sandpaper. This scabbard and end of the sword handle was painted in the same way as the arm.

Shoes
The shoes came from another TK. Already orange in parts. I painted some areas of the shoes a dark grey. Drybrush weathering was applied with MIG weathering powder Gulf War sand and white acrylic paint. I also did the same at this point over the trousers.
Finishing touches

A tattoo, the Japanese symbol for ‘brave’ was painted on the right arm. (Tip: Do your research when using other languages and letters… you don’t want to think you’re putting a cool symbol for the word “Killer” only to find out it means “fluffy taters”. The KDA TK has two pairs of painted on crisscrossing white plasters. Rather that painting them over, I went with them, and made them a bit more realistic by making new ones from thins strips of pale masking tape. Just to keep the orange accents working through I painted in an orange chin stripe.

Thanks Paul! If you enjoyed this and want more, let us know! In the meantime you can also check out a bunch of other great toy workshops right here on RTR! Happy tinkering! – Knives

Two Custom TK’s by Paul
Don’t forget you can always follow us on Facebook, Youtube, Twitter and Instagram for more toy news, reviews, photos and videos! Aloha!

Pingback: Rad Toy Review's "The Workshop" - OSW: One Sixth Warrior Forum