*REVIEW* 3A RVHK Tomorrow King

INTRO

It’s been awhile since I’ve been so excited about getting a figure dropped on my doorstep. 3A’s ReVenture Hong Kong 2012 show held host of quite a few exclusives that only those lucky enough to attend the show could get their greedy little mits on. That is, until the remaining tiny allotment was released on bambaland.com about a week after the show wrapped. I was at a friends house, enjoying a cold beverage and some freshly made salsa when the sale went live. I logged into bamba and waited for the first tid bits to load. I knew it was going to be chaos trying to score ANYTHING and that most likely the thing I wanted most (an Old Guard) would also be the most impossibel to get. Exclusives began to trickle onto bambaland.. so far, no Old Gaurd. Each hit of f5 was another spinning beach ball of 5 minute limbo. Finally, the TK box art popped up. I speedily clicked “add to cart” only to be forced into pumping my brakes hard, treated with yet another loading screen some 8 minutes in length. “Come on, come on, come on.. big money.. BIG money.” I’m sure I was muttering something along those lines. Suddenly the message on the screen caused my heart to sink into my shoes. A “server error, server too busy try again later” screen popped up. Knowing how crazy people would be to score one oof these excluves, I knew it was over, that I’d lost out. I failed to score a Tomorrow King.

Just before I closed my screen, I noticed the URL address still read as if it was on my cart page. I decided to hit refresh instead of the back button to see what would happen. After what seemed yet another eternity of waiting, my cart screen loaded up with the stubborn TK still inside! Stunned, I quickly hit the pay/checkout button and watched with delight as my order processed.

Now he’s finally here, my Old Guard. My Tomorrow King.

PACKAGING

What TK worth his salt hasn’t come in a lovely illustrated box? OG is no different. The front is splashed with a dynamic AW painting with a color coded dot on the top to indicate whether you received the blue, black, red or yellow TK. I got red. On the back has something ripped from Ash’s sketchbook with kitty purring the word “Exclusive” in bold letters! Yup, it’s legit!

WHAT’S INCLUDED

I was hoping for a poster, but I’ll settle on just getting the figure. Sigh. 😉

Brass tax. You get your TK and his single trusty sword.

THE BREAKDOWN

3A’s Tomorrow King isn’t anything new. Many 3A collectors have at least one in their collection tucked away somewhere. There’s the Oyabun, Heavy TK, 7 Bones and Interloper to name the few. There hasn’t been much description of exactly how the Old Guard truly fit into Popbot lore (the storyline Tomorrow Kings originate from). The original Tomorrow Kings are often referred to as the “OGs” (Original Gangsta’s), so it’s fitting that “OG” in this case stands for Old Guard. It’s a nod to the original Tomorrow Kings that are so cherished and desired by 3A collectors the world over. Given the relative difficulty scoring these guys, that desire is likely not to diminish despite their new car smell.

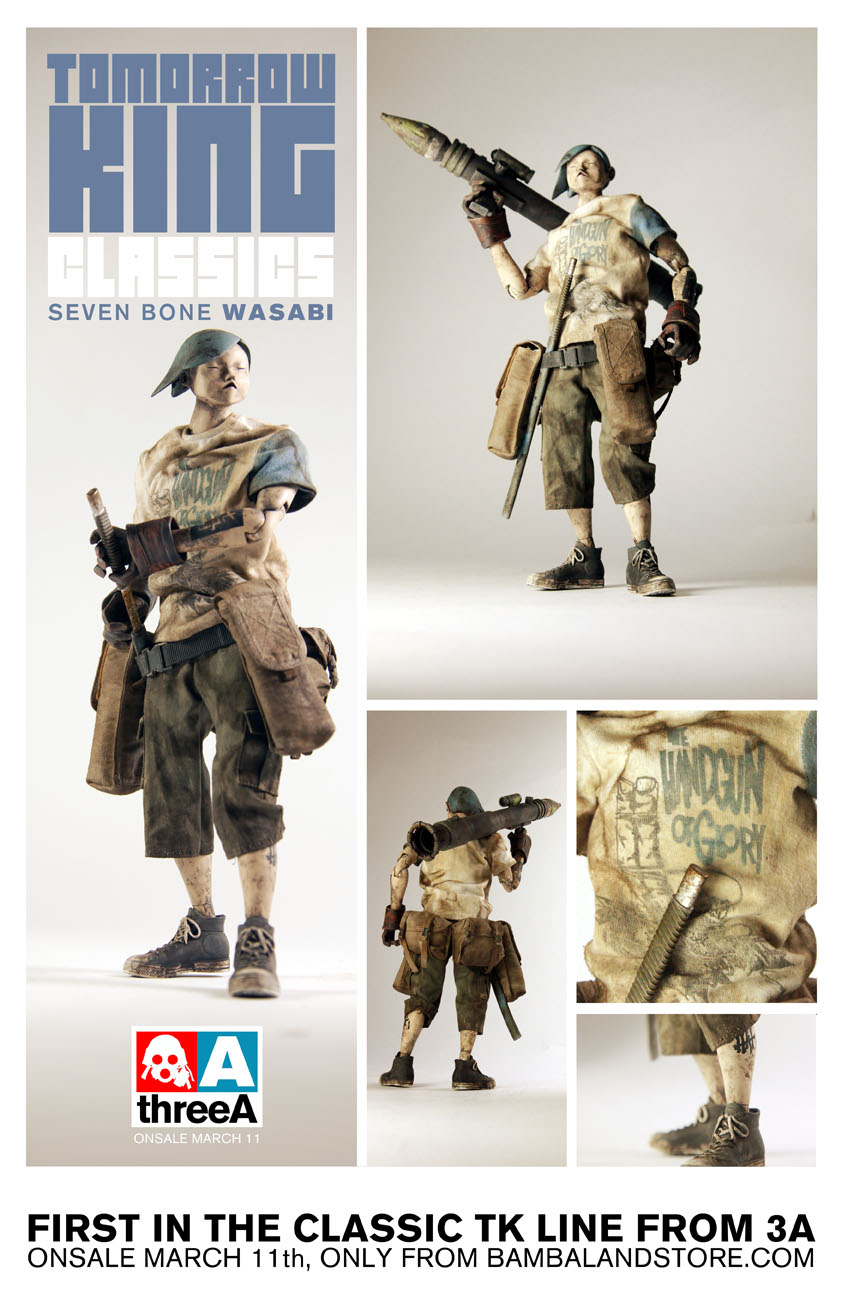
There’s a definitive simple elegance that’s just shy perfection in the design of the Tomorrow King figures. It’s something most people who don’t collect or own one won’t pick up on. Heck, I didn’t really get it until earlier last year when 3A released (and shipped) the first of their 7 Bones TKs, Wasabi. With their clean, not overly fussy design and punk rock meets japanese ninja ethos, I don’t find it all that shocking that many think the TK is THE perfect action figure.

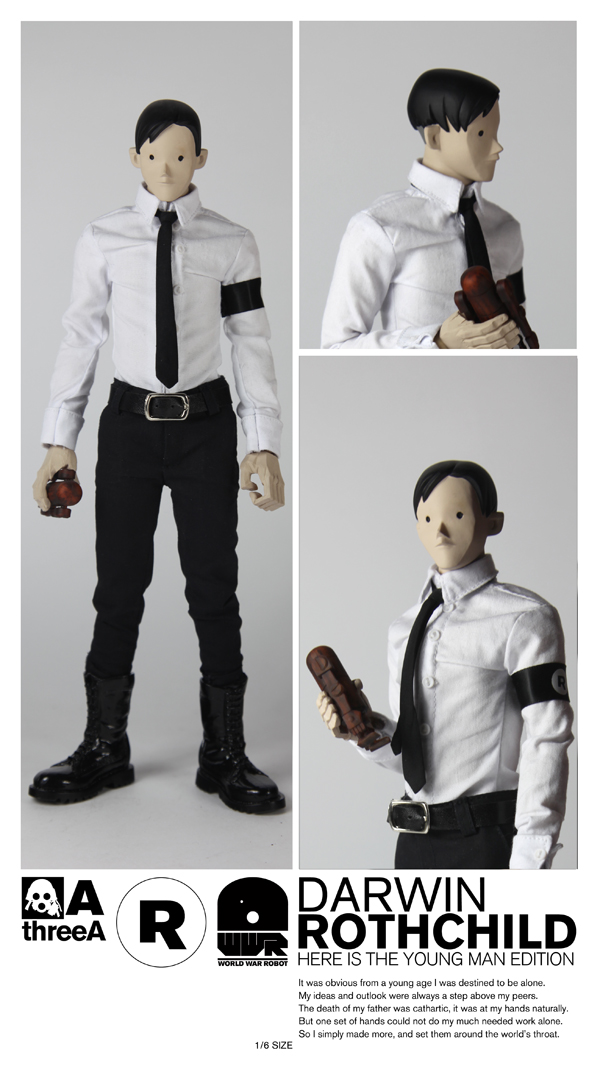
So while I assume the Old Guard is a return to that simple elegance of the original Tomorrow Kings, 3A didn’t simply sew up a new batch of shirts and send these guys on their way. The Old Guard actually has an all new body (One shared by the forthcoming/currently landing on doorsteps, Rothchild). Most noticeable is his slimmer silhouette with narrow shoulders. I’ve read some refer to it as the kid or teenager body. One even called it the Bieber body. I laughed at that. Here you can see standing side by side with Wasabi just how much of a visual difference it makes.

You can also see from the same pic that Old Guard’s tee is much more fitted than Wasabi’s.  I can’t say which I prefer as they both work well for the characters. I may give a slight edge to the new body as it seems to work better visually with the lean, mean fighting machines that TKs are suppose to be. But I like the look of variety between them!

The tee shirt itself is what some may feel is a smidge “porny” while others will claim it simply “art”.. whatever you want to call it.. it’s an image of some sort of visually decapitated women in panties and bandages with her boob hanging out. Honestly, of the four Old Guards it’s not my favorite. I like the red color a lot, but find the design on the black and yellow to be much more in tune with my personal style.

Visually, my RVHK score is a slam dunk. I love the orange hair and red shirt. The paint is nice, clothes run or snag free. The new slim profile looks fantastic. Head to toe, I’m digging the orange headed Bieber. So what else do we have here to mess with? Ah yes, articulation!

At first blush, it’d be easy to believe that the articulation is the same as it’s ever been. Knees and elbows are double jointed, wrist spin and twist (a little loosely for my taste). His torso bends in various places and his ankles have those love them or hate them double ball joints. The hands are the same sculpts we’ve seen for years on Tomorrow Kings. One hand molded for gripping the sheath, the other a little tighter to handle the hilt of the sword. Nothing new there.

Or is there? As much as I think the new slim bodies really enhance the overall look of the Old Guard TKs, I did find one little hiccup in it’s execution. I’d even call it a step backwards. Due to the decrease in torso real-estate, the head/neck has less room to wiggle. The head/neck of the OG’s are not redesigned to compensate for the smaller area at the neck joint. What this has done is prevent as full of a range of movement side to side (ear to shoulder) as previously possible.

In the picture above I’ve pushed both heads sideways as far as they’ll go and I think it’s pretty clear how much of a difference that extra space makes. It was probably not worth the effort/expense to 3A to develop an entirely new neck post just for the Old Guards, but it IS kind of a shame it’s even an issue.  I guess we’re to believe these guys are warrior ninja’s capable of all sorts of insane giant robot crushing acrobatics and limber twisty turny ninja skill.. as long as they don’t have to crane their necks too far.

Maybe they are much older than they look?

Other than that, I only have a few small nagging complaints here and there. The first, I mentioned before is the incredibly loose wrist joints. My Wasabi has had the same helicopter wrists since day one, so it’s not exclusive to the Old Guard. I’m sure some will have a lucky die roll and get perfectly taught wrists that can manage whatever pose you twist them in. My OG needs physical therapy. The other “ugh” I muttered came when I first put his sword in his hand. I realized that the blue wash used to get into the creases of his gloves was still wet! The paint wiped off the sword fine and there was no noticeable smudging on the gloves themselves, but it’s still a nuisance. This isn’t baked goods, we’re don’t need our toys piping hot still smelling of the oven.. the paint should be dry/cured before it hits our hands. Kyuuketsuki anyone?

FINAL THOUGHTS

I’m all about Tomorrow Kings and am thrilled to have one from 3A’s Hong Kong ReVenture in my possession. Though not my first pick, (that would have gone to blue or black) red looks just fantastic. In fact, amongst the blue and neutral tones of my other TKs, he really stands out.

Posing and snapping shots of Tomorrow Kings is always a lot of fun. The strength of their character really blooms when you find the right light, angle and pose. Their faces are practically without expression but sculpted in such a way that they lend themselves to whatever type of mood it is within your imagery that you’re trying to capture.

I wish I could say, “Everyone should go out and buy one of these guys right now at your local Toy Store!” But you and everyone else knows that’s impossible. The ebay prices are silly.. stupid even. I’ve seen more than one of these OGs up for almost a grand. I find that hard to stomach, not only because it’s a freaking toy!! BUT some of the ACTUAL OG Tomorrow Kings aren’t fetching those kind of prices. Unfortunately, the flip factor for these guys is pretty high and ebay is evidence of that. Douche-McGee’s came out by the truckloads to Hong Kong to buy these guys just to flip for extortion level prices. Instead of supporting these layman of the avid toy collector’s bile ducts, reach out to your favorite toy community. Be patient. Something will come up eventually. I doubt you’ll get a hand out and I’m sure you’ll end up paying a good deal more than the 90 stones or whatever these guys were at retail, but I can almost promise you’ll get better results dealing with collectors community than the sultans of ass-hattery on ebay.

The more I’ve played with this guy the more I realize I’ll probably be right there with you, holding my breath, abiding my time and waiting for that WTS post. Daddy needs a black and blue. 🙂

Pros:

  • Classic Tomorrow King design.
  • Fantastic toy to play with and shoot photos of.
  • Great quality and care throughout
  • New slimmer body/silhouette looks fantastic
  • Box Art

Cons:

  • Slim body lessens neck articulation substantially
  • Loose wrists
  • Do to exclusive status, they’re being flipped like there’s no Tomorrow… King. (whamp whamp)

Help us improve this site by letting us know what you think! Follow us on Facebook and Twitter to stay updated!

.

.

.

.

.

.

.

.

THE WORKSHOP – MK 2.1 Square by Paul Benson

I’m happy to be able to bring you the step by step process of one of Paul’s most impressive custom projects yet, The MK 2.1 Square. I was blown away when I saw the finished piece and asked Paul if he’d mind putting something together for us to glean a little wisdom from. Grab your least favorite toy, an X-acto blade and some super glue and follow along!

Also, please don’t hurt yourself..

Enjoy!

– Knives

MK 2.1 Square
Although folks may not want to do a conversion like this one, hopefully the techniques I have used may help people to do their own thing. Certainly, by my reading of workshop articles on various websites and magazines, I have learned how to do things over the years.

So I wanted to tweak a MK 2 square into something that might be able to move faster and could be used for reconnaissance, intelligence gathering, spotting for snipers etc.  When in trouble, it could get out of there very quickly.  It would be capable of being out in the field for days and could withstand all weathers.  I toyed with the title of a Mk 2.1 Square.
I decided to buy a second JEA Mk 2 Square to work with, because (i) I wanted the converted square to be Joint Earth Army and (ii) the original would act as reference material for the custom build.  The aim would be to modify it by reducing the size of the head to reduce it’s weight allowing a better leg power to weight ratio.
Although I wanted to reduce the size of the head I still wanted to leave enough of the front to have all the facial features there and retain the full ball joint mechanism inside.  I reckoned I could reduce the width from 75 mm to 45 mm. I was not quite sure by how much I could reduce the height, because of how big the ball socket was, until I opened the head up.
Using a fine marker/pen I drew continuous lines around the head on either side of the face. This would be where the first two cuts would go.  With a hack saw I produced four main pieces that I will bond back together later.  I was only able to remove 10 mm from the height of the head.
The pieces needed to be tidied up with a Dremel and sandpaper before gluing them together.  I realised I may need to strengthen the new structure as I was not sure if the force need to turn the ball joint might break it open.  To do this I used pieces of balsa wood bonded inside with super glue, I then strengthened the joints quite crudely using a glue gun.
The sides were cut to size and then glued on.  Household filler was used to fill all the gaps and then sanded down.  The new dimensions of the head/body are width 45 mm, height 50 mm and length (of side) 70 mm compared to the original MK 2 Square which were, width 75 mm, height 60 mm and length (of side) which was the same.
The scope was made from Evergreen Scale Models strip styrene.  I used two sizes of square section strip to make the structure, one slightly smaller than the other, so that it could be made to pivot. The pivot is just a piece of circular rod styrene.  The eye piece came from my “bits box”.  The lens is just clear styrene sheet cut to size.  The scope was glued to the head before painting.  The eye ring and lens where left off until the Square was finished.  The eye ring was sprayed black.
The conversion was always going to be a JEA Square and by using a JEA MK 2 Square I could use a lot of the square without having to paint the entire thing e.g. the legs, face, fuel tank (I assume it’s a fuel tank), body below the head etc. I would have to paint the parts of the head that had been modified. For the base colour it is always a good idea to spray paint to get a good finish but I needed JEA green!  Not like it’s immediately available amongst the colours in model stores I’ve visited.  I did venture into the realms of using a spray gun a few years back, but the time spent cleaning it was very frustrating.
I therefore elected to use Citadel acrylic paints which I would apply with a broad paint brush to give as smooth a finish as possible.  I made up the JEA green with Citadel acrylic paints (available from Games Workshop stores and hobby shops).  After a bit of trial and error, I ended up mixing mainly Astronomican Grey, with a little bit of Fenris Grey and Snot Green (don’t blame me it was the names on the pots!!).  Other colours could probably be used. Just eyeball it.
Next, it was time to apply the insignia, of which there were only two different ones ‘JEA 80’ and ‘YUMIKO DIV’.  I photographed these on my original Mk 2 Square.  Using Photoshop, I reduced the two insignia in size to better fit the new head.   They were then tweaked using ‘brightness/contrast’, ‘desaturate’ and ‘invert’.  They were printed and cut out with a sharp scalpel. I did need to suspend some of the centres of certain letters by leaving a thin strip of paper acting as a bridge.  I also made a few mistakes, but corrected them with small pieces of masking tape.  Each stencil in turn was placed in position and stuck down with Tamiya masking tape, I used cling film to cover the rest of the square.  Just before spraying I noticed that edges were lifting around some of the letters and numbers. To correct this I used small pieces of Blu Tack, which while not perfect isn’t really a problem as the insignia on ThreeA toys are often broken up to simulate weathering.  I could correct the letters and number later if necessary with white paint.
To apply the insignia I used Humbrol acrylic matt white aerosol spray. Having applied one insignia I had to strip down the masking and apply the next.  I needed to use ‘JEA 80’ twice as it was on both sides of the head.
The next job was weathering.  ThreeA toys can vary in weathering and the second JEA Mk2 Square, which I converted, was more weathered than my original one.  They legs were certainly more brown, so I would have to weather the head and scope to match in with the legs.  Again, I would use Citadel acrylic paints.  I started by applying a thin wash of Dark Flesh (which is a reasonable mid rust colour) mixed with a little Chaos Black. The colour was blended into the white areas of the face.  During this early stage I painted on a ring of black around the eye.  I did this by cutting out a paper stencil, with two circles the inner one being held in place by thin strips of paper.  The stencil, cut to size, was then taped over the face and I then very carefully painted between the circles. When the stencil was removed, where the thin paper strip had been, was painted over.
The edges of the head and scope were stippled with small pieces of coarse sponge dipped in a mixture of Scorched Brown mixed with Chaos Black.  In parts the same was done with grey I mixed from Skull White and Chaos Black to represent paint chips and again with Blazing Orange mixed with a little Dark Flesh to represent rust spots.  A fine paint brush was also used with these three colours to refine and emphasize some of the stippling as well as to pick out the scratches and dents on the sides of the head.  The rust colour was used as wash to run into depressions and as trails from areas here rust might have gathered.
For finishing touches the inside of the scope was painted back and the lens and eye ring glued in place. I also added an eye lens after painting the eye black. I used a punch (see above picture) to cut out a 6 mm disc from shiny coloured plastic, bought as cheap folders for notes.  I got the punches on a well known online auction site, as set of sizes from 3 mm to 8mm, which work for other eye sockets I have used them for.  They will stay in place pretty well if you don’t want to risk permanent change to your 3A toy, but a touch of super glue on the edge will secure them even better.
Thanks for your interest in reading this article.
We hope you enjoyed the latest Workshop. Big thanks to Paul for once again putting this together for us. 
 We’d love to hear from you and check out what kind of customs you’re working on! Send us a shot of your latest custom work with a brief description to radtoyreview@gmail.com. 

Hit us up on Facebook or Twitter pages to stay updated whenever we post new Workshops and epic toy reviews!

Until next time!


*REVIEW* 3A JUNGLE VET

INTRO

It”s been ages, but finally the dreary dull period of nothingness has come to a sharp and abrupt end. Today, the long cold chain of having exactly zero boxes labeled “3A” sitting at my doorstep has finally been broken. Jungle Vet from 3A’s retail assortment of Adventure Kartel toys has arrived.

Purchasing the full retail run of these guys would be a great start to just about anyone’s 3A collection, however Rad Toy Review was only able to snag one. We’ve been holding our breath since then in hopes our choice was indeed a wise one.

Early opinions from other collectors seemed extremely polarizing as well as fairly consistent. Of the the AK gang, the overwhelmingly positive praise seems predominantly aimed towards Jungle Vet (whew!) and Pneumbra. The lukewarm, comfy room temperature praise to Tommy Red, Lil Shadow and Johnson. While an apparent and almost unanimous negative panning has marred the arrival of the otherwise beloved Hooded Zombs.

Alas, this is NOT a review about Zombs or anything else other than Jungle Vet. So lets get to that.

First let me say that the photos that accompany this review were taken on the first official RtR “field trip”. A field trip to Pearl Harbor. While it’s not the jungle, the seemingly military background of JV lent itself to what we hoped would be an fun and interesting shoot.

It turned out to be both those things as well as a little… surprising.

PACKAGING

Ed’s note: My Jungle Vet came from Sideshow Collectibles in a brown Sideshow shipping box. The JV box itself was not shrink wrapped.  Don’t be alarmed if your’s shows up the same way as apparently that’s how most of these were shipped out from 3A. It’s normal.

Much like the retail release figure’s afore mentioned opinion polarization, the packaging for them shares the same mark. Unlike the epic paintings that usually grace 3A boxes, we’re left with a simple graphic depicting Jungle Vet. Astute observers might notice that all 3A did was take the initial preview photos of the various AK figures and then toss some vector artwork over it. I think it fits pretty well with this line. It’s lends itself to animation, it’s playful, clean and gets the job done. I’m cool with a little variety in my boxes, but I also know for a fact there are those who feel a little shortchanged with the lack of a true Ashley Wood painting.

On the back you get a little preview of the rest of the collection you can hunt down at your favorite retailer (providing they sell 3A toys) and the Adventure Kartel slogan, “The Adventure continues with you!”

WHAT’S INCLUDED

The Adventure Kartel series proper has always come with a poster with a comic on the back giving us a tiny slice of the AK story. Sadly, the retail gang did not get the same treatment. Tis a small thing, but given Adventure Kartel’s track record for including one, I feel the absence is note worthy. It’s also little odd to me because paying retail for these figures is a good deal more expensive than what a similar offering that included posters in the past go for on 3A’s own Bambaland website.

So what do you get? Well, really what you paid for. Jungle Vet himself sporting a gaggle of bags and his (or rather Bleak’s) trusty side arm.

THE BREAKDOWN

As mentioned above, for this shoot we decided to take Jungle Vet to Pearl Harbor and see what sort of trouble he could get into. A grown man with a group of camera wielding ladies carrying a doll (cough* action figure!) around a historical site which also happens to be a functioning military base, garners more than the occasional stare and sideways glance.

Pearl Harbor has some pretty strict rules about what you are allowed to bring in with you. Bags of any kind are on the list.  So how does one smuggle a 1:6 scale action figure into such a locked down establishment?

Like so. Shhhhhh…

So we waltz into the memorial and then take a bus over to the Battleship Missouri Memorial. For those that don’t know, it’s a massive battleship, the last one built by the United States. She was used heavily during World War II and provided fire support during Desert Storm back in ’91. She’s a beauty and a beast.

Once we got on deck and I started to play around with JV, the first thing I notice is probably the first thing you’ll notice. His hands rock! They’re so much fun to pose. The fingers are firm but not tight and I didn’t once worry about any of them snapping off. I know, I know.. they’re basically ripped off an 1:12 armstrong and shoved onto an Ankou body, but fun is fun I say.

I also love the fact that the hands are different colors. It’s as though Ol’ Jungle Vet has seen a few scraps in his time and has required some maintenance over the years. I’ve always had a soft spot for robots that look hobbled together from various tossed away bits. I’m not sure if an Ankou is 100% robot or a man-bot.. or whatever.. but the fond leaning remains.

The paint and weathering on JV are nicely done. His dome is overly rusty with pops of crusty blue paint peaking through. The yellow ring around his eye ties in nicely with his left yellow hand. His right red fist has three black fingers further supporting the “hobbled” together patch work he might have had while on the battlefield.

I’m definitely a fan of the new hooded boiler suit as it just about doubles the different looks you can go for when setting him up on your shelf. The hood itself has an underwire around the brim so you can shape it some, though the suit rests fairly high overall and despite my efforts he always seemed to wind up with one form or another of pointy hat syndrome.

The camouflage on his boiler is the best 3A have done so far. Unlike the more hand painted flecks that appear on Jung De Plume, Pathfinder Ono Oya or the Jungle Grunt, Jungle Vet’s seems to be an actual camo pattern that’s simply part of the fabric. Across JV’s chest is two white “v” marks that call back to military badges and symbolism. The weathering for the boiler suit is what we’ve all seen before, faded and mostly dusty with a few heavier stained touches here and there.

Of course underneath it all is a standard issue white 3A shirt. I understand branding is important, but I really would like to understand how everyone from all walks of 3A toy life has managed to score one of these Ts. Are they the GAP of 3A land? Also, if all the toys have them, why can’t we? Where’s our 3A logo T-shirts? Anyway, it’s there in case you need it, but I preferred  the look of keeping his suit zipped.

Again, the hands are just so much fun. I never really warmed to the original Ankou. I’ve had several in the past and have long since sold or traded them off. The mono eye is cool/funny, but I found the clamps too be somewhat restrictive to the character overall. I had a few laughs displaying my old creepy grinning Ankou using his clamps to try and lift Cherry Shadow’s skirt.. but beyond that I never really found a use for them that resonated with me. Others may have had much greater success and wouldn’t trade off their old Ankous for anything but take my word on it.

Jungle Vet is waaaay better than they are.

Jungle Vet as character feels more sneaky than dangerous. There’s something goofy about the Ankou design that keeps you from taking one seriously. I really like that about them. JV continues the feeling of playfulness and in fact might enhance it with the added (and personally much applauded) digits.

So yes, the hands are awesome and the gun JV comes with is awesome. Unfortunately for us, they weren’t made for each other and that’s less than awesome. JV’s gun is originally from Bleak Mission who’s hands are sculpted to fit the hand cannon. Despite JV’s awesome dexterous digits, he’s not as fortunate. He can hold the weapon, but he can’t fire it. As is often times the case when things are retrofitted after the fact.. they don’t technically work together.

Jungle V’s fingers are simply too fat for the trigger gaurd, or the trigger gaurd is too small for Jungle V’s fingers. It’s a small thing but it does add a little more fuel to my one criticism of Jungle Vet and that is the fact that he’s basically the result of company level kit bashing.

Even if you take into consideration the added hood on the boiler suit, there’s really nothing “new” about him.  The body is the same old 3A body, the head and boots are from an Ankou, the boiler suit is from Zombs, and his hands are from either a 1:12th Armstrong or a Bramble. The bags and t-shirt are from countless other 3A figs and the gun is from Bleak.

I can’t decide if the fact that so many existing parts were used to build this guy should bother me, or if I should just marvel at how well it all works together.. AGAIN to create a seemingly unique new figure to play with.

This is about the part of the photo shoot where we were interrupted.. or rather, we interrupt others. As we move down the deck of the Missouri, we suddenly and unexpectedly ran into..

Rihanna. “Heyaaah.”

Without thinking it through I waved at her with a toy in my hand. She politely smiled and waved back.

It turns out, the day we chose to do our photoshoot also happen to be the day that some of the stars of the movie “Battleship” would be aboard to do some interviews and DVD extra’s shooting. We continued our own shoot and made a quick pit stop by where they were setting up to film to see what we could see.

As they walked pass, I don’t think anyone “got” why a grown man was holding a toy, posing and taking pictures of it. I can’t blame them.

Taylor Kitsch didn’t get it.

Brooklyn Decker gave us the stink eye…

Alexander Skarsgard kept looking over at as with an almost visible “?” above his head.

(editors note: Alex turns out to be a really nice guy. He came over later, shook our hands and took some pictures. I should have had him hold Jungle Vet for one.. but that’d been a little “Dance monkey! Dance!” I think.)

Anyway.. back to the review.

FINAL THOUGHTS

Jungle Vet is a bunch of different bits and pieces of 3A toys cobbled together and sold to us like something brand new. I’d call it snake oil if it didn’t work so totally well together. 3A is already known for putting out high quality, dynamic and highly articulated toys. What we have here is one of the best elements of the WWRp line of bots combined with the flexibility and articulation of the 1:6 human figure line. You’ll be able to squeeze more poses and gestures out of JV than any other figure currently in your collection. That in itself, makes him feel all new. Yes, his gun SHOULD have fit his hand. Though honestly, this is something I’ve learned to accept from 3A. My WWRp Warbots fingers can’t fit his guns and they were MADE for each other. Blind Cowboy’s hands are sculpted to fit his yet they’re a tad big and his grip is a little fickle. I’m not sure why this is, but for whatever reason, 3A’s “gun to fit hand perfectly” ratio is just not very good. Yet I can almost promise you it won’t detract from your enjoyment of this guy.

I enjoyed taking Jungle Vet to the Pearl Harbor memorial and posing him in various locations while snapping pictures like a fiend in front of various tourist and sailors. Despite wagging him raggedly like a goon at Rihanna as she walked by I think the shoot went really well and may be our best yet!

Opinions may be scattered on the quality of the Retail Adventure Kartel collection. Some  have said it’s left a bad taste in their mouth and are even questioning whether or not they’ll continue to collect 3A. (Suuuure.. ) But I can assure you that Jungle Vet will live up and perhaps even surpass your expectations. It’s the most fun I’ve had with a toy this year hands down. Seek him out, try not to pay the flipper price and add him to your collection. Should you buy? Yes!

Pros:

  • The hands make the man/machine. Adds a ton to your poses and to his overall character.
  • The paint and weathering is up to snuff and sure to please.
  • New camouflage is better quality than in the past. Looks to be an ACTUAL pattern instead of a haphazardly painted one.
  • My favorite take away from the original Ankou the googley eye, is still fun to play with and good for a laugh
  • He’s a near perfect 3A kitbash

Cons:

  • He’s a near perfect 3A kitbash
  • Boxart might turn purist off
  • Unlike bambaland released Adventure Kartel Figures, no poster or extras are included with the retail released AK

Yeah.. Rihanna didn’t get it either..

Help us improve this site by letting us know what you think! Follow us on Facebook and Twitter to stay updated!

THE WORKSHOP – Crossbow by Paul Benson

Paul kicks out another Workshop jam! Today he’s actually fulfilling a special tutorial request made by RtR reader Gwen. We were asked if we could shed some light on how to make a modern crossbow. I responded by saying that I’d do my best. It turns out my best is asking Paul!

once again with absolute flying colors..

Enjoy!

– Knives

CROSSBOW
About a week ago I was asked if I could “figure out a way to make a crossbow”.  I wasn’t sure whether I would make a good job of one; but I saw it as a challenge and went for it. I scribbled down some notes below to describe how I did it.
To start the project I needed to research crossbows. I printed out a few pictures of some from a web search and pulled out my stock of Evergreen Scale Models strip styrene. I then did a sketch of the crossbow bearing in mind the strip styrene I had. To help move things along, I pulled a M4 shoulder stock out my ‘bits box’ to work into the design. You could probably cut one off of any old 1/6 rifle you have lying around. The sketch was done to the same size as the crossbow which will help in cutting the styrene exactly to size.
On to the making! In previous articles I have mentioned the materials, tools and paints I use.  Here are those tools again, if only to show the saw that was really useful in making this model. Also I want to be sure to mention the glue again, which is a thin super glue that can be obtained from Games Workshop vendors. The great thing about it is, it comes with a little brush inside which gives you loads of control.
The picture below shows the crossbow with the parts labelled.  The notes below explain how the parts went together.
Part [a] is a piece of 6mm by 6mm square hollow section styrene. The rear of which has been cut at an angle. After about 20mm, the front top of the section is completely cut away to take two pieces of styrene (parts [b]) that will form the channel for the bolt fletching.
Parts [b] are two pieces of 6mm by 2.5mm solid styrene, spaced slightly apart and glued to part [a].  The gap between parts [a] and [b] are filled with super glue by simply painting into the gap several times until it was filled.
Part [c] is also a piece of 6mm by 2.5mm solid styrene glued centrally along the bottom of part [a].  I used the handy modelling saw to cut the trigger guard out from the rear of this piece.
Part [d] is another piece of 6mm by 2.5mm solid styrene.  A piece of 3mm semi circular styrene is glue to the back of this piece to shape it to be more like a hand stock.
Part [e] is the M4 shoulder stock.
Part [f] is a piece of 5mm tube which fitted perfectly into the shoulder stock and part [a].
Part [g] is a piece of 3mm by 2mm solid styrene.
Part [h] is a piece of 5mm tube styrene.  I made a sight line from some heat stretched sprue from a plastic kit (see pictures below).
Part [i] is cut from of 6mm by 2.5mm solid styrene then shaped with a scalpel and sand paper until it looks like a trigger.
Part [j] the bowstave, limb or prod (it seems to have several names) is made from 1mm sheet styrene.  To get the shape right I folder paper in half and then in half again.  I then drew a slanted line from 4mm to 6mm.  The centre of the bowstave would cover the end of parts [a] and [b] glued together.  I also cut a slot for the bolt fletching to go through.  PLEASE NOTE: If I were to attempt this crossbow again I would use slightly thicker styrene sheets for two reasons 1.it snapped under tension whilst the base coat of paint dried, being under tension may have caused this and 2 although the bowstave had a very realistic bow to it, it seemed to straighten out after a while (still not too shabby looking).  I did try to improve the bow and also make a repair by gluing two strips of 1mm styrene onto the front. I think it gave it some cosmetic interest as well as served it’s repair purpose rather well.
Part [k] is a 5mm tube styrene cut in half.
Part [l] is some type of man made fibre cord I found in the bits box.  Keep in mind that if you use thread for modelling projects you can usually see lots of fine loose threads that do not look very realistic. Choose wisely.
Part [m] the string is again a piece of cord, from a camera I believe.
Parts [n] are two pieces of copper wire cut and then slotted through two holes drilled in part [a].
Part [o] is a piece of 3mm by 2mm solid styrene.
Part [p] the bolt shaft, is a piece of copper rod.  The ‘pointy’ end is filed and then finished of with fine sandpaper.
Part [q] the fletching is made from paper.  Paper was folded in half and then in half again. A single feather half was cut to make four. These were then glued to the shaft and then painted with super glue to give them a little more thickness/strength.
Part [r] is just a thin collar cut from a cotton bud tube.  Super glue is then painted onto the end of the bolt to give a better shape.
To paint the crossbow, I first washed it in soapy water to get rid of dust and grease marks. Then I base coated it with Humbrol matte light olive aerosol paint.  Similarly, the bolt was sprayed with a matte black Humbrol aerosol paint.
After leaving the pieces out over night to dry, the crossbow was further painted with some Citadel acrylic paints and MIG weathering pigments.  First it was given a wash of Camo Green mixed with Chaos Black.  When dry, I dry brushed with Camo Green mixed with Skull White.  General wear and tear marks were made with a sponge, putting specks onto the crossbow using Dark Flesh, Chaos Black and Blazing Orange. A wash of MIG old rust was applied liberally to nooks and crannies.  While drying I blending it onto flat areas with a cotton bud.  The sight line in part [h] was painted with Blood Red.  The crossbow string was painted with Chaos Black and then dry brushed with grey made from mixing Chaos Black and Skull White.
The taping on the hand stock is just some linen wrapped around it and painted with a wash of Camo Green, dried and then glued in place.
The black bolt was dry brushed with the afore mentioned grey made from Chaos Black and Skull White.  The fletching was painted with Dark Angels Green, and then dry brushed with the same colour mixed with Skull White.  Stripes were added with Blood Red. A simple. useful trick here is to just hold a brush in place while rotating the bolt.
And FINALLY.. the pointy end was then dry brushed with Boltgun Metal.
We hope you enjoyed the latest Workshop. Big thanks to Paul for once again putting this together for us. 
 We’d love to hear from you and check out what kind of customs you’re working on! Send us a shot of your latest custom work with a brief description to radtoyreview@gmail.com. 

Hit us up on Facebook or Twitter pages to stay updated whenever we post new Workshops and epic toy reviews!

Until next time!