Many of you may already know who WWWetworks is, but even if you don’t you’ve probably seen some of his amazing customs. Even though he’s only been rocking customs for a few years, his commissions are in high demand. On top of that he’s a massive 3A fan with the bulk of his work revolving around their 1/6 line. Please check out the gallery after this workshop to see a few of his previous pieces.
This is the first workshop of a series Carlo (WWWetworks) has planned for Rad Toy Review. This one is the warm up, an appetizer, aimed mostly at beginners or those curious to see what Carlo uses to do the things he does. Follow along and it’ll ensure you have all the tools you need to get started and be able to handle the dirty task of weathering like a champ. Enjoy
– Knives
Alright, for this project, I started out with a WWRp DIY De Plume. I don’t just jump in and start painting, I prepare the surfaces first to make sure everything comes out exactly as I want it to.

All the plastic bits get covered in base/primer to prep for my paints.
I use Dylon stain remover before washing the clothes in a lukewarm bath. It’s very easy to apply, just rub it on the weathered areas you want clean.

After my surfaces are ready, it’s time to work. I won’t go into my exact process here (next time) but my general workflows is..
- base/primer
- enamel or acrylic paint for the base color
- weathering pigments/paints
- top coat
The acrylics I used for this particular project :
- Lifecolor – dark rust
- Hobby Color – aircraft gray
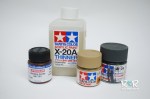
- Tamiya – chrome silver, dessert yellow, dark grey and flat black
I use paint thinner to thin the paint if I want a smoother texture (no brush marks) and to create wash (a light, watery, diluted paint).
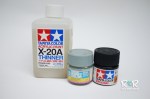
Below are the products I recommend for use on each specific part:
These five for the helmet, hose, face mask.

I used a sponge technique for the helmet and the hose to give it a nice varied texture

Next up, the shirt was stained with a wash technique built up in layers using the paints below.

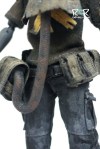
For Noms pants, I simply dyed them black and followed it up with a wash of light gray…

.. using these.

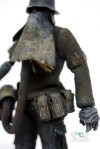
The final result.

Easy right?
That’s it for now! It’s brief but I do hope you found it somewhat informational and hopeful for your own projects. Next time I’ll go into more detail on specific techniques such as how to apply custom decals with t-shirt transfers. Cheers!
Some of WWWetworks previous works gallery
-

- Fem Zomb
-

- JDF Baka
-

- JDF TK/TQ
-

- Medic Bothead