THE WORKSHOP – WWWETWORKS “SHIRT DECALS”

WWWetworks is back with another great tutorial for The Workshop. Carlo breaks down the step by step process on getting your own pimp decals laid down on some tiny cotton T’s (or undies, jorts, tube tops, etc..)

Enjoy!

– Knives

PART 1: PREPARATION

Ok first you have to choose the image that you would like to put as a decal, in my case I found an image of lasstranaut and make sure that it’s above 500px so your image will be crisp and detailed.

Once you have an image ready, you will have to edit it in Photoshop by cropping the picture. In this example, I managed to separate the image and added a black background, so why black? because the shirt that I will be using is black, you should always remember to use the color of the shirt, etc. red shirt = red background. This is crucial especially if you have a very complex and small image with a lot of details. In this case I didn’t have to cut away all the inner parts of the picture because it already had a black background. Convenient and makes the process much easier. Once you’re done adjusting, just save it out as a jpeg or tiff.

Ok, in the next step you will need to measure the area on the shirt on which you will lay down the image, in my case its 6cm x 9cm.

Now open Illustrator and draw a box with a 6cm x 9cm measurement and place/import the image into the workspace.

Scale down your image and place it inside the square, the square is your guide so make sure your image does not exceed the given area.

Now you’r ready to print. There are two types of iron-on papers, light for light colored fabric and dark for dark colored fabric. In this case, I printed the image using transfer paper for “DARK” fabrics. Make sure you set the paper quality to “BEST” to get a high grade print.

Now you’re decal is ready to be applied.

PART 2: APPLYING THE DECAL

Now that you have your decal printed out, cut the black background leaving at least a 1mm margin.

This is another critical part because most folks don’t know that you have to peel the back of the paper before ironing it into the shirt

Position your decal carefully and grab a piece of onion skin paper (most iron-on papers come with this inside their pack).

Put the onion skin paper above the decal and set the dial of your iron to “cotton”.

Once the iron is ready, press it against the onion skin paper for a maximum of 10 seconds. Make quick presses to the sides and be careful not to burn your decal.

This is what it looks like with the onion skin paper after ironing. CAUTION! VERY IMPORTANT! DO NOT TAKE THE ONION SKIN PAPER OFF THE SHIRT WHILE IT’S HOT!!

Allow it cool down for a few minutes and you will see that the paper will actually start to detach from decal pretty easily.

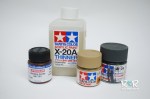
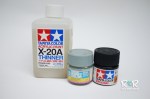
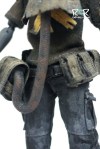
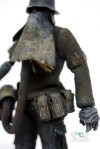
Now you’re done! Here is the final piece, I added an acrylic wash to the decal and some weathering to help blend it in with the rest of the figure. I hope you enjoyed this tutorial, cheers!

Custom TK by wwwetworks

Custom TK by wwwetworks


Thank you Carlo! New Workshop tutorials soon! Follow us on Twitter and like us on Facebook to stay updated!

This Monday

This Monday, we have another fantastic tutorial for The Workshop from customizing ninja WWWetworks! Don’t miss it!

The Workshop – Jim Bailey’s “Custom Action Portable Negra/Blanco TK”

This continues our “The Workshop” series. We hope you enjoy this one and check back soon as we have many more on the way.

Jim Bailey, aka Grindhouse is today’s Workshop master. An architect, painter, kit-basher, and games designer, Jim’s got his hand’s in quite a few different creative pies… and boy do we like pie!  

Almost as much as we like to learn cool new techniques to push our customs and creations further. Thanks Jim!

–  Knives

Custom Action Portable

Sometimes I get an idea that so totally overwhelms me that I’m like a zombie all day at the office and only come alive when I get home and start working on it. As I was finishing this project last night, I realized that I had killed a 12 pack of beer and a few shots of whiskey and was so engaged in the work that I didn’t notice.  Zombie effect today not caused by excitement about project!

Custom Action Portable TKs! These are the first three of five that I have planned. Blanco and Negro ares super duper easy. You CAN try this one at home. What follows is a fairly detailed step-by step for Negro and then some narrative description of how I did Blanco and Interbaka.

Negro:

Custom Negro TK

1. The components you need are a Noir Deplume (minus feet, hands, pistol, head, and hose) as well as feet, hands, head, and swords from a Yellow Jacket.

what you need

2. Carefully unscrew wrist screws part way to remove Deplume hands. Screw back in while working then unscrew later to put the final hands on. Do not force. You will break the joint.

unscrewing the arm

3. Spray all the components from the Tomorrow King with flat black. Use Krylon or Citadel.

spray it down

4. Remove boots, head, hose, gun/holster form Deplume

de-ccessorize

5. Remove Deplume shirt, turn inside out, and carefully remove the stitching that holds on the long right sleeve. Use Xacto knife or razor blade.

removing the sleeve

6. Fold back edge of sleeve and sew to match left sleeve. It won’t be an exact match but close enough for government work.

matchy matchy

7. Get the trousers to fit how you want by folding the cuffs up inside and sewing a stitch or using a little piece of double stick tape. You can cut to length instead but that requires hemming and limits future options. Soak the trousers in water when they are in place to make them wrinkle and conform to his body in the manner you wish.

work pants

8. Paint Feet and hands with a latex satin black paint such as Citadel Chaos Black or Liquitex Mars Black. No cheap craft store paints! To chalky and/or grainy.

9. Mix a dark gray of your liking.

10. Paint the hair.

silk and smooth

11. Mix one part gloss varnish to four parts black paint.

12. Paint the face with this mix.

paint the face

13. Final components, ready for assembly and posing! Note that the sword and sheaths have flat black spaypaint as their finish application.

all the pieces in place


Blanco:

Blanco TK

Get yourself a DIY Deplume and carefully unstitch the sleeve. Get feet, hands, swords, and head from a Yellow hornet and spray with Krylon flat white. Then take white acrylic paint and mix 4 parts to 1 with an acrylic gloss varnish. Paint face, hands, and feet with this blend. This step differs from the Negro process. Leave the hair and swords as Krylon flat white.

Interbaka:

Interbaka

Action Portable Interbaka is another kettle of fish and should not be attempted by the faint of heart. I used a Hatchery Guard as the base along with swords from a Yellow Hornet. The power pack is from  AP Jungler Dropcloth. The grenades are a little small because they are 1/18 scale: acquired from Marauder’s Gunrunners.

I hadn’t sewed anything since about 1978 so I was a bit daunted. I sewed up the sweatshirt  and bandana out of material from one of my old t-shirts. I then created a makeshift light table and traced the art that I had pieced together and warped out in photoshop using a .05 Staedtler Pigment Liner with waterproof archival ink. It bled a little but not too bad. I then created the webbing by sewing up scavenged bits and clasps from other action figures. Next, I bleached and repainted the Hatchery Guard trousers. The hair was then  sculpted using Plastruct plasticard and Kneadtite “green stuff”.  To do the electrified swords, I added a couple of plastic bits to the back pack and drilled holes. I then drilled two holes in each sword: one at the pommel and one on the handle. I then threaded guitar wire through it all and tied it together with pliers. The wire floats free inside the backpack so all the bits can be easily removed for posing, etc. Finally, I painted it! That’s an article in itself. I may do an article on weathering, wipes, and rusting one of these days.

Enjoy

Jim Bailey aka Grindhouse


The Workshop – WWWetwork’s “getting prep’d”

Many of you may already know who WWWetworks is, but even if you don’t you’ve probably seen some of his amazing customs. Even though he’s only been rocking customs for a few years, his commissions are in high demand. On top of that he’s a massive 3A fan with the bulk of his work revolving around their 1/6 line.  Please check out the gallery after this workshop to see a few of his previous pieces.

This is the first workshop of a series Carlo (WWWetworks) has planned for Rad Toy Review. This one is the warm up, an appetizer, aimed mostly at beginners or those curious to see what Carlo uses to do the things he does. Follow along and it’ll ensure you have all the tools you need to get started and be able to handle the dirty task of weathering like a champ. Enjoy

–  Knives

Alright, for this project, I started out with a WWRp DIY De Plume.  I don’t just jump in and start painting, I prepare the surfaces first to make sure everything comes out exactly as I want it to.

All the plastic bits get covered in base/primer to prep for my paints.

I use Dylon stain remover before washing the clothes in a lukewarm bath. It’s very easy to apply, just rub it on the weathered areas you want clean.

After my surfaces are ready, it’s time to work. I won’t go into my exact process here (next time) but my general workflows is..

  •  base/primer
  •  enamel or acrylic paint for the base color
  •  weathering pigments/paints
  •  top coat

The acrylics I used for this particular project :

  1. Lifecolor – dark rust
  2.  Hobby Color – aircraft gray
  3. Tamiya – chrome silver, dessert yellow, dark grey and flat black

I use paint thinner to thin the paint if I want a smoother texture (no brush marks) and to create wash (a light, watery, diluted paint).

Below are the products I recommend for use on each specific part:

These five for the helmet, hose, face mask.

I used a sponge technique for the helmet and the hose to give it a nice varied texture

Next up, the shirt was stained with a wash technique built up in layers using the paints below.

For Noms pants, I simply dyed them black and followed it up with a wash of light gray…

.. using these.

The final result.

Easy right?

That’s it for now! It’s brief but I do hope you found it somewhat informational and hopeful for your own projects. Next time I’ll go into more detail on specific techniques such as how to apply custom decals with t-shirt transfers. Cheers!

Some of WWWetworks previous works gallery