*Review* CS Moore Studio’s Alice in Wonderland

INTRO

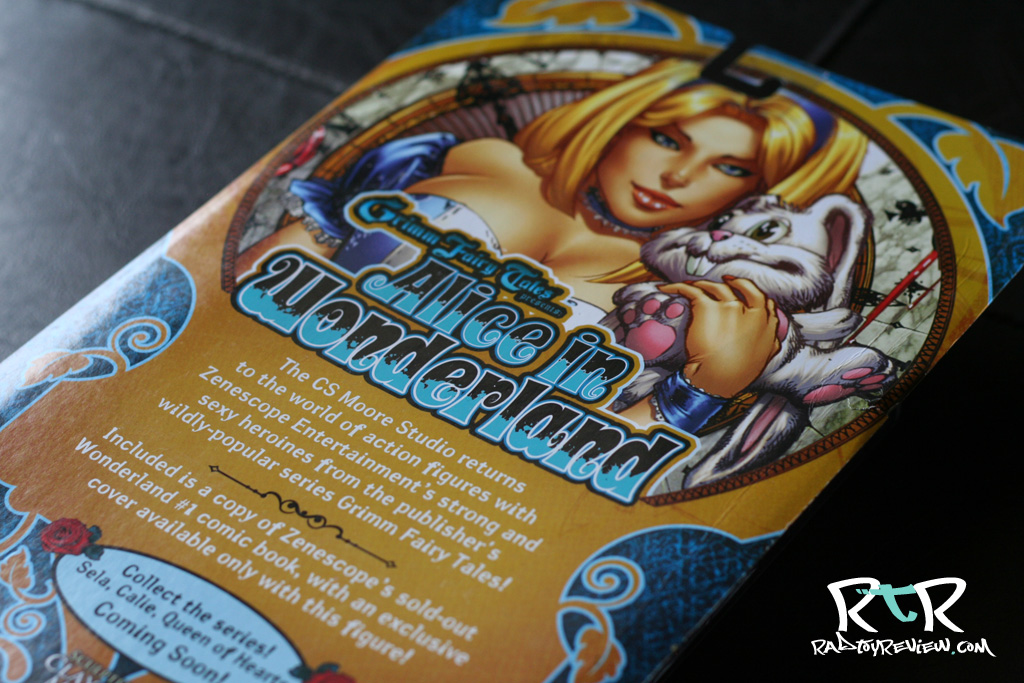
Today we’re reviewing one of the first toys in a long time from CS Moore Studio and Zenescope Entertainment, Alice. She’s based off the publisher’s popular comic series, Alice in Wonderland.

I don’t get a ton of time to read comics these days, which I consider to be extremely detrimental to my well being. Short of the comic that come packed in with the figure, I’m not super familiar with the storyline backing her up. All I have is my inherent familiarity with the old school Alice of my childhood.

Well I can assure you, this Alice is NOT the Alice from my childhood.

PACKAGING

Alice comes packed in the same type of classic action figure bubble card we’ve all come to know and love. Some vibrant and colorful artwork of Alice from the comic covers the card and some short intro-info is written on the back.

WHAT’S INCLUDED

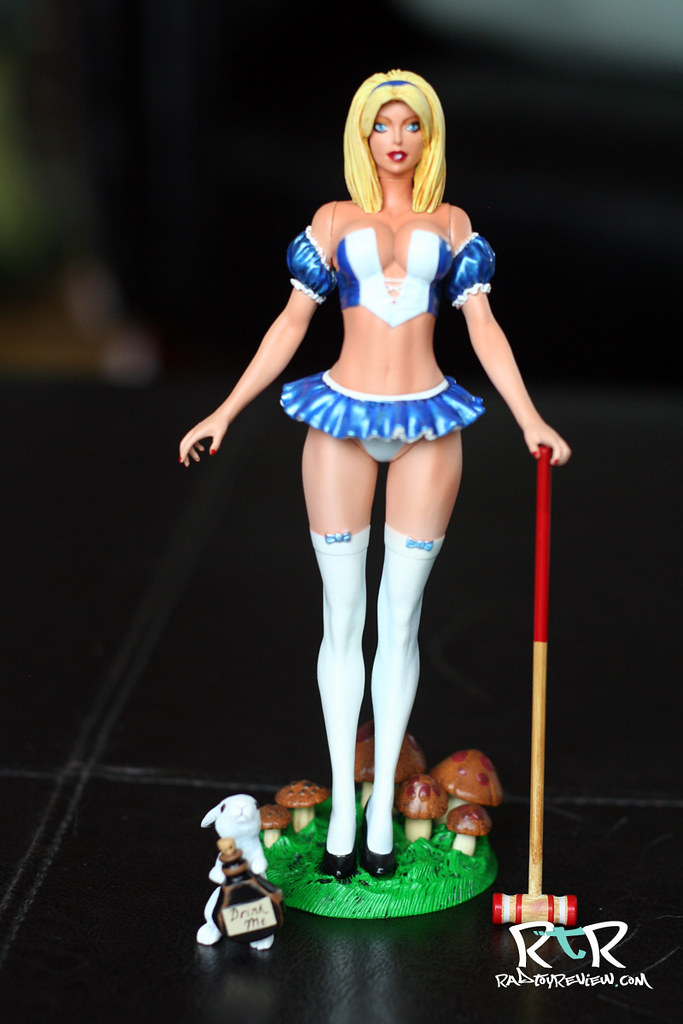
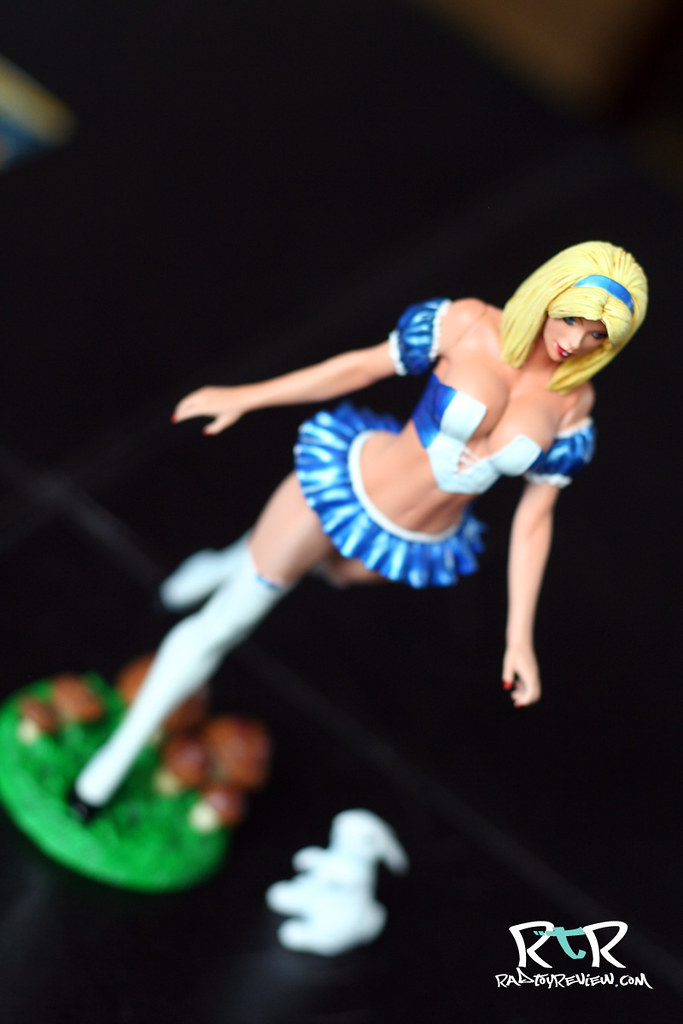
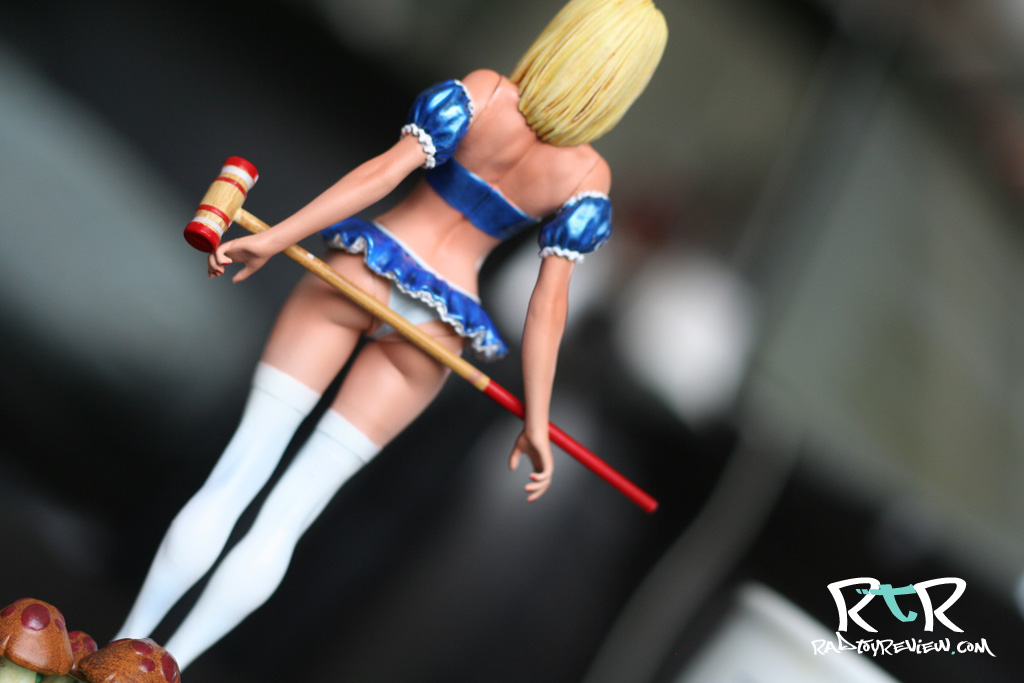
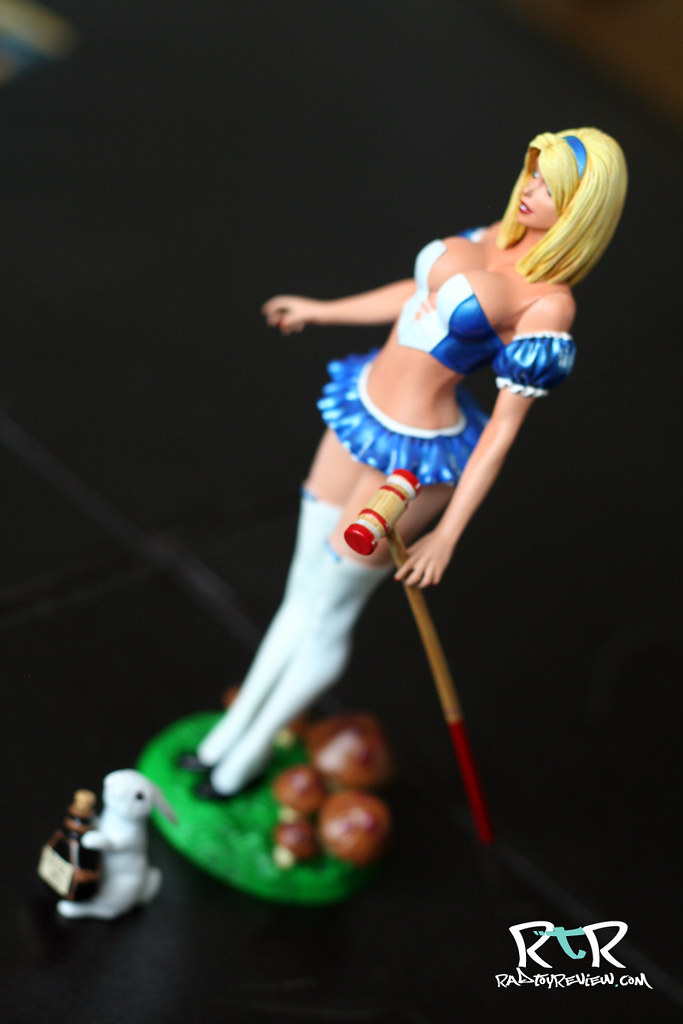
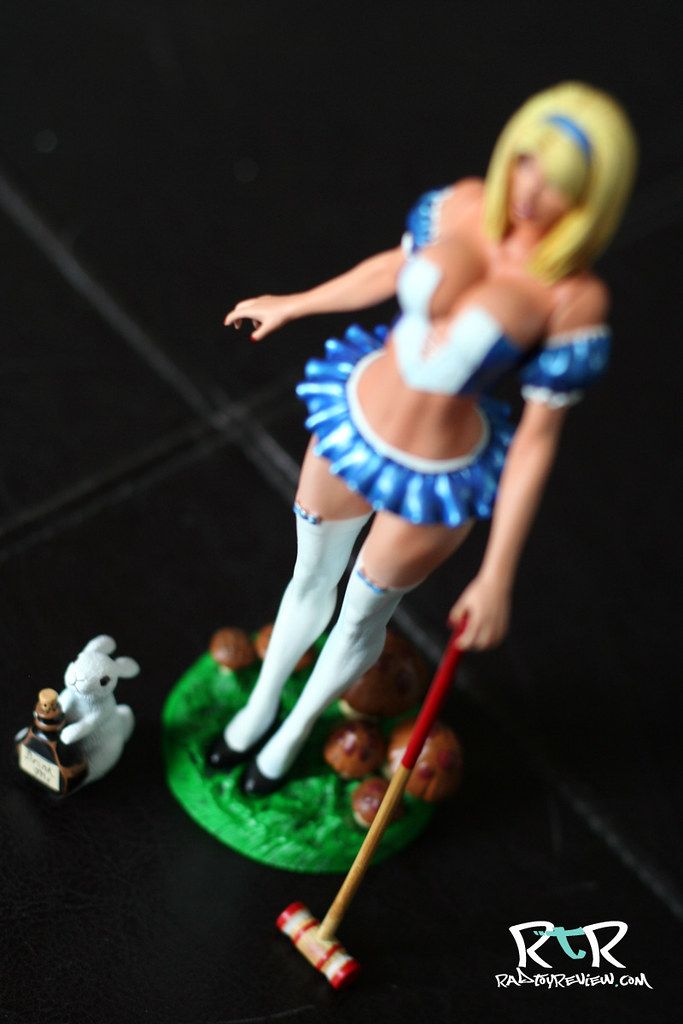
Along with a much more.. uh, mature Alice, you get a couple of cool extras to accessorize with. The most important of them is probably the mushroom covered base for Alice to stand on. The ever-iconic white rabbit is included as a trusty companion of sorts along with a small bottle and mallet. Finally, you get a copy of the 1st issue of Alice and Wonderland to read up on the goings-on in Alice’s world.

THE BREAKDOWN

I first happened upon these figures at the CS Moore Studio’s booth while attending SDCC this year. I was actually scoping out some prototypes of a few of their upcoming Jurassic Strike 5 action figures when I looked up and saw the wall of Alice staring at me. After a brief discussion with some of the staff on site, I learned that Alice is the first in what they hope is a continuing series of figures based off Zenescope’s Grimm Fairy Tales comic series.

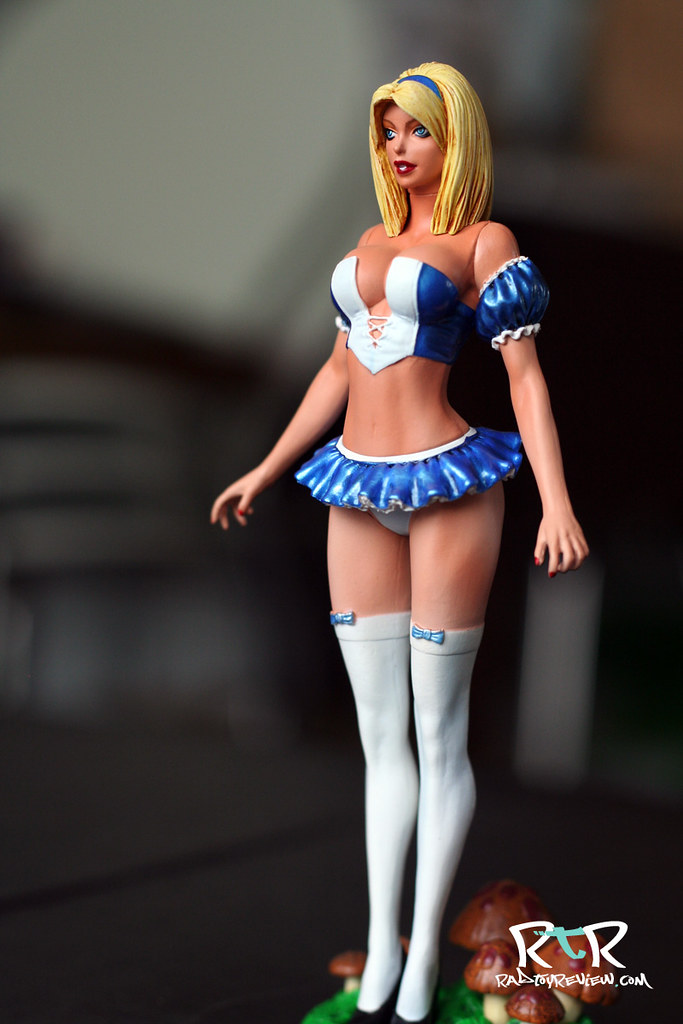
Fast forward to today and I’ve managed to pry open the bubble pack and get a closer look at how CS Moore Studios did with the debut. First thing I noticed was how incredibly well done the paint is… OK, the FIRST thing I noticed was how “breezy” our heroine is dressed for her day out in Wonderland. The quality paint job was second, a strong close second.

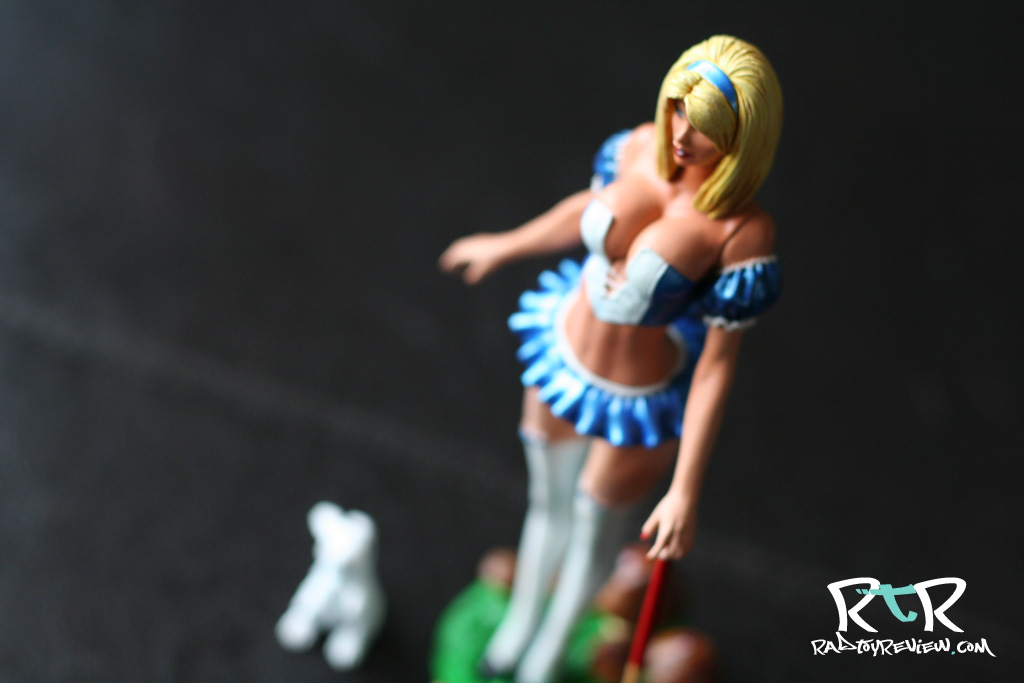
Hopefully you can see from the pics I’ve taken just how nicely detailed Alice is. There’s actual gradients and variance in the shades of her skin, along with finely painted details around her skirt. They took care not to let much, if any paint creep over onto neighboring surfaces. With the help of the underlying sculpt, they also managed to paint an attractive female face without making her look walleyed or man-ish. Two things that tends to plague female action figures at this scale.

Speaking of sculpt, Moore did a great job at capturing the likeness of the sexy comic vixen. Yes, she is definitely curvy and long leggy.. wearing something that  would probably be more appropriate for sleep wear than adventure wear. All in all, she’s basically a 35 year old.. AHEM! I mean, a 13 year old boy’s comic book girl dream.

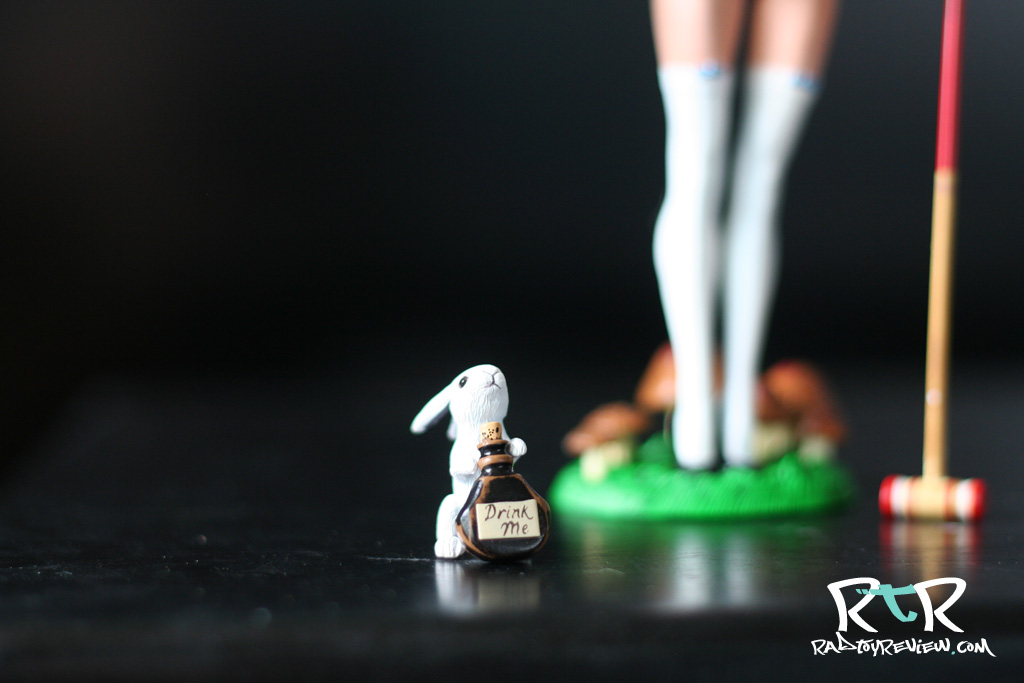
I really like the little white bunny Alice comes with. Most toy companies would have been happy with simply casting a bunny in white plastic and being done with it.. at most giving it a quick grey paint wash. But just like Alice, he’s really nicely painted right down to the highlights in his eyes. The little “drink me” bottle fits nicely in his paws.

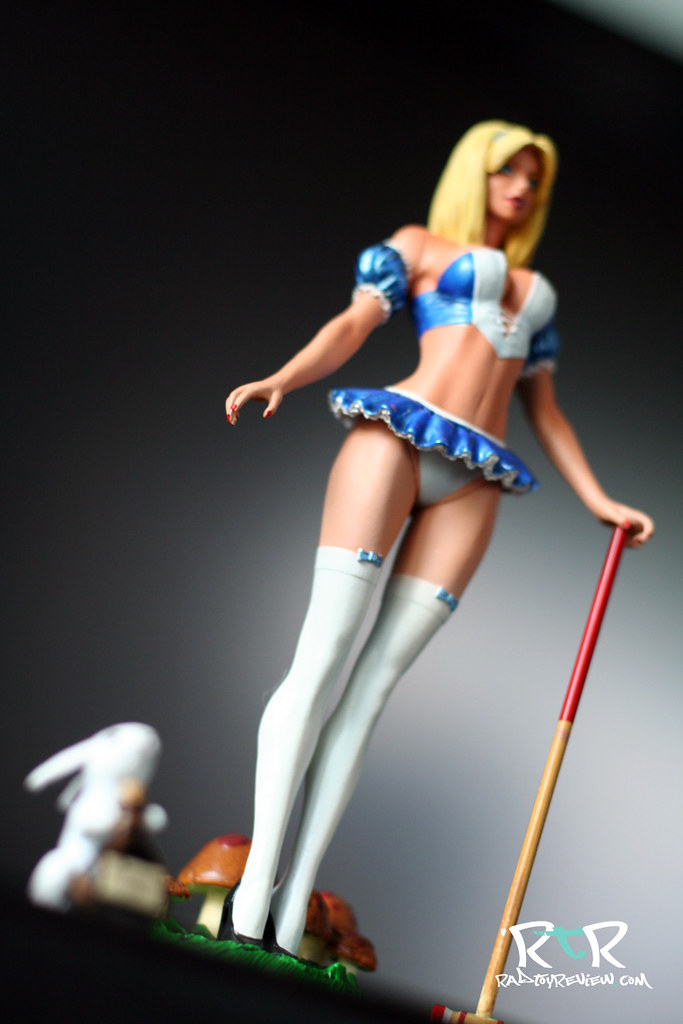
As I mentioned before, the mushroom laden stand is the most important accessory you get with Alice as she cannot stand without it. Oh high heels, how’s a girl supposed to go on epic adventures? Thankfully, it looks good and Alice’s feet fit the pegs perfectly. The necessity of the base will serve as my segue to discuss Alice’s articulation or rather, if articulation was necessary on figure like this. Alice is referred to as an action figure. She’s herald as the first in 8 years from CS Moore and camp. The thing is, her articulation is so basic I can’t really imagine a situation in which anyone would play with her as such.

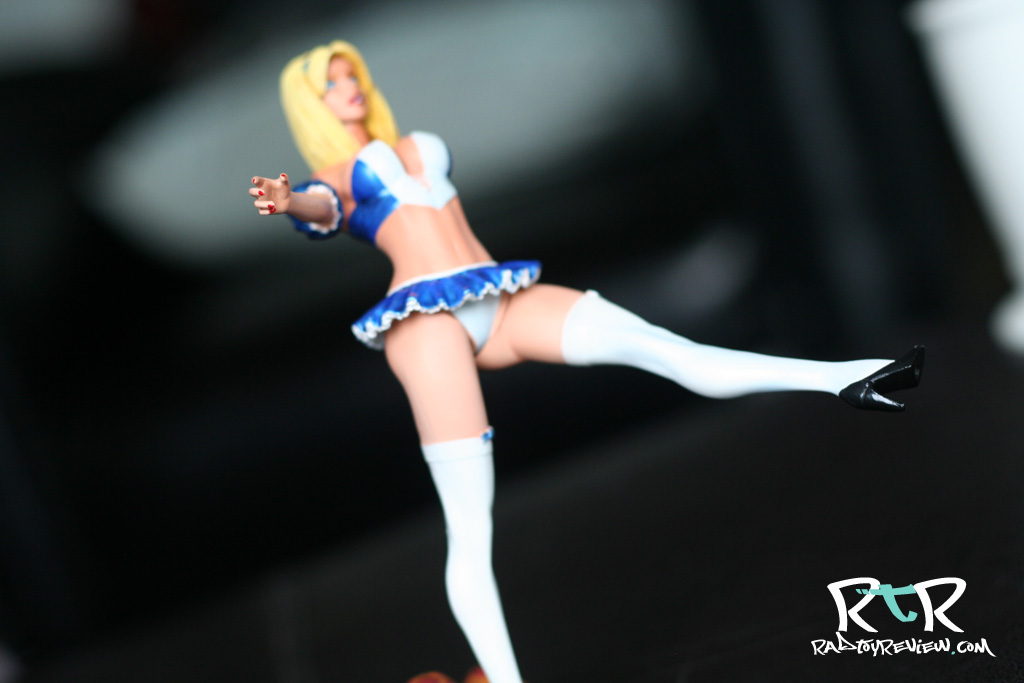
The minimal amount of moveable joints on Alice was probably more of an aesthetic choice than anything. Much like every line a comic book artist adds to a female’s face adds age to the character, adding a bunch of seams and joints to a female figure tends to take away from her feminine charm. Alice has shoulder swivel joints, a waist and neck swivel joint and leg swivel joints. The arms and waist look fine when moving them around and don’t detract too much from the figure. The neck joint is a little difficult to turn due to the hair sculpt draping over her shoulders. The real reason for my ire comes from the leg joints. Since the joints are angled and sit high on her hips, her leg swivels up/back and way out. I can’t think of anything PG13 or below that would benefit from that motion. Sitting for Alice is even a bit on the racey side.

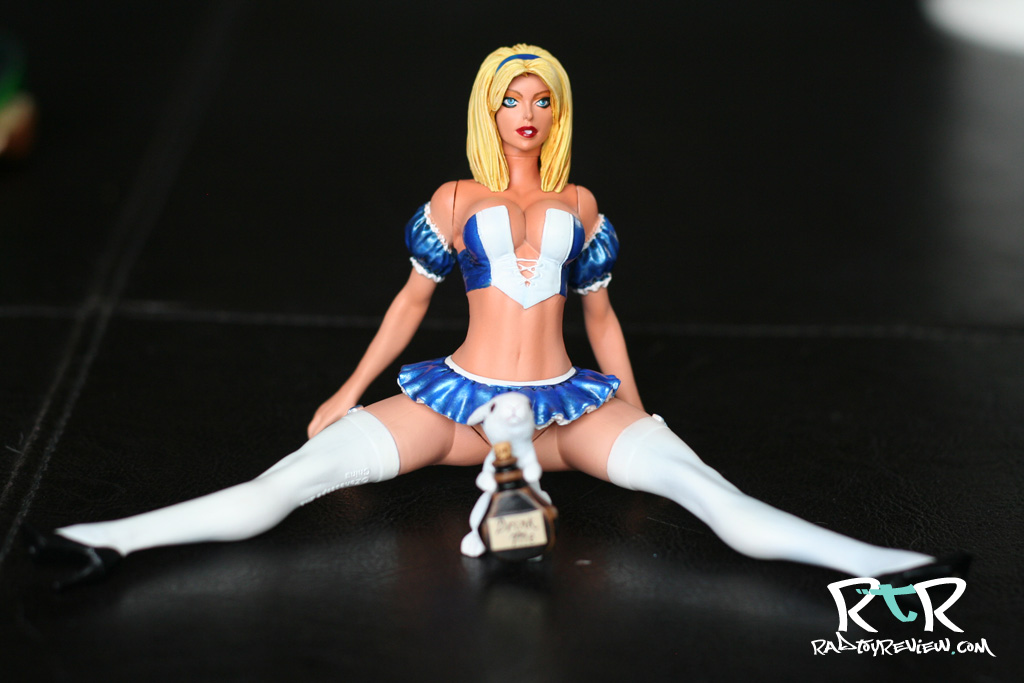
Once you’ve moved her legs from their default position, it’s nearly impossible for her to steadily stand in her mushroom base. So what do you do? You keep her legs exactly where her grandmother told her to keep them, together and down. So you’re back to square one. You’re back to her default, out of the box pose. Moving Alice’s legs more than a few millimeters makes her look awkward and uncomfortable. Moving them at all makes it nigh impossible for her to stand. I managed to get her into a decent walk pose, but she fell after a few moments. Stupid gravity.

To add to the awkwardness that is her semi-poseable legs, the cool little mallet she comes with, doesn’t really fit her hands in the traditional sense. She can’t hold it as a weapon. You can find ways to wedge or prop it.. but it’s obvious that the intended way to display her with it is back in her default, out of the box pose.

So much works so well as long as Alice stays in her default pose. Which causes me to question, why is Alice an action figure at all? Kotobukiya have been doing amazingly well with their Bishoujo line of cute and sexy static super heroines. Static vinyl has got to be less expensive to produce than articulated action figures. I’d be just as happy with Alice if she just came in a dynamic or even simple pose, with no articulation at all.

FINAL WORD

Aesthetically, Alice looks great. That was clear to me before I even opened the package. Moore sculpted an attractive, bubbly and sexy toy. Pop her out of her package, put her on the mushroom stand and set her on the shelf. She looks great!

Much like her comic book counterpart, I think Alice may have fallen through a magical action figure door that bends reality and asks the question, “what is an action figure?”  I’m so used to heavily articulated toys at this point, it’s a little difficult for me to take Alice at face value and accept her as one. On the other hand, tell me she’s a beautifully crafted, static display piece and I’ll bite completely. If you’re in the market for a really well sculpted, nicely painted and sexy action figure, sans “action” to add to your collection, Alice may just fit the bill.

Pros:

  • CS Moore did a fantastic job with the sculpting and paint application on Alice. She’s attractive and true to the source material
  • All of Alice’s accessories are painstakingly detailed
  • Love the bunny!

Cons:

  • With her limited articulation, Alice isn’t really much of an action figure
  • Alice’s one “weapon” doesn’t actually fit very well in her hand. Looks better when propped.

A big thanks to Shelley Moore of CS Moore Studio for supplying us with Alice for review! 


Help us improve this site by letting us know what you think! Follow us on Facebook and Twitter to stay updated on all the latest reviews, previews and toy news! / / / / / / / /

.

.

.

.

.

.

.

*Review* 3A and Valve’s SDCC 2012 Companion Square

INTRO

This may be the shortest review in RtR history. I won’t even call it a review,  it’s more of a “Hey kid, quick peaking in my window!”

I love Valve. Not to sound like the guy who says “I love lamp”, Valve is a game company that makes awesome games. Half Life, Portal, Counterstrike, Left 4 Dead, Team Fortress, etc etc.. Games that I’ve been playing since I was a wee boy. They make magic in a box and I’m a long, long time fan.

When 3A announced their partnership with Valve software, I literally did a back flip over a donkey. Hunting down a donkey in Hawaii is more difficult than it may seem, but the occasion called for and justified it completely.

I imagined how awesome 3A’s version of D.O.G, The Combine or Zombies would be. As cool as Adventure Kartel was, I thought Team Fortress figures would be even cooler. An image of a 1/6 scale Freeman sitting on my desk with his bloody crowbar and “buddy” headcrab came to mind almost instantly.

Whelp! Instead of any of that awesome sauce, 3A’s first offering to us was this guy. A toothy, smiley 1/6 WWR (Portal?) companion square. Basically 3A’s iconic Square with the decals of a companion cube.

Cute.

PACKAGING

A clean white box is the initial home of your companion square. Some nice decal/design work that seamlessly integrates a bit of 3A and Valve’s unique charm

WHAT’S INCLUDED

There’s the little guy! Daaawww… Other than the cutest little square I’ve ever seen.. Yes he IS! Other than bucky here, you also get a card that has codes and what not on the back that supposedly does something awesome somewhere Valve-y.

I admit, I have no clue what it does. I’ll need to load up PORTAL and look into it further.

THE BREAKDOWN

I’ve always preferred the classic stub legged, two eyed squares to the newer long legged, mono eyed ones. I had a.. we’ll call it.. impassioned discussion with a friend about why one is better than the other.. he standing on the opposite side of the fence than me on the subject. His argument was that the stub legs never made any sense in WWR. How are these little guy suppose to be scouts, move quickly, slip behind enemy lines etc? Plus he hated their goofy, cutesy face.

He said, “The longer legs on the MK2’s made a lot more sense for recon. Plus, the monocle eye is far more menacing and creepy.. even with that buck tooth grin.

And there it is. This is a robot with buck teeth. I’ll repeat that, a ROBOT with freak’n buck teeth. Long legs or not, it’s not SUPPOSE to make sense. Why are you trying to make it do something it’s not suppose to do? THAT doesn’t make sense.

To me, aesthetically, these MK1 style squares are cute and perfect just as they are. They’re iconic to 3A and will remain that way long after we’ve all forgotten how ugly and stupid the MK2’s were. Argument won, simply because this is my site. Suck it Garrett!  😉

Honestly, there’s not a ton else to say about this guy. The paint and weathering is of your standard grade A, ThreeA quality and the companion cube likeness is immediately recognizable. The heart shaped decals look like and are where you’d expect them. As an afore mentioned fan of all things Portal, it’s fun to see all the little references such as the “Aperture Science” logo and falling cube warning.

Basically what it’s going to come down to is if you like the MK1 squares or not. Also, are you man (or woman) enough to deal with pink hearts on your toys? If the answer is “yes” than you’ll love this guy.

I’ve gotten a few reports from people saying that theirs has a different decal on the back plate than mine.        I wonder how many variants there are…


FINAL WORD

I know a lot of people were moaning that this was a stupid SDCC publicity stunt and not at all something the fans wanted. Where’s our Gordan Freeman? Where’s our D.O.G? Where’s our Left 4 Dead Zombies? Why isn’t the grooves of the companion cube sculpted into the square instead of just painted on? The list of not-long-for-this-world horse beating goes on..

Look, this was the first thing out of the gate. To me, it’s a handshake. A glimpse meant two give us a good idea that these two companies are joining up and are planning some cool stuff down the line. We’ve seen glimpses already of the incredibly intricate Portal bots on display at 3A’s Reventure. The other SDCC exclusive was from Team Fortress, the Heavy’s “Sandvich”. I think that alone shows we can expect some really unique things to come from this partnership.

And I, for one, am really looking forward to what’s next!

Pros:

  • MK1 Squares are the best Squares
  • The Valve/3A partnership exists!
  • Buckteeth robots are indeed cute
  • The paint/weathering is done very well. Not a quick or sloppy app. in sight!

Cons:

  • SDCC exclusive makes it more difficult for fans to get
  • If you don’t like bucktoothed robots, this guy won’t do anything to change your mind.

Help us improve this site by letting us know what you think! Follow us on Facebook and Twitter to stay updated on all the latest reviews, previews and toy news!

/

/

/

/

/

/

/

/

THE WORKSHOP – DIY Mini Bertie Custom (PART 4 of 5) by markovengine

We continue with part 4 of our 5 part tutorial series by markovengine! 

If you need to catch up:

Part 1 – DIY MINI BERTIE CUSTOM PAINT TUTORIAL

Part 2 – PAINT BODY AND CREATE DECALS

Part 3 – PLACING DECALS

Enjoy!

– Knives

———————————————————————————————————

Part 4 : WEATHERING

———————————————————————————————————

4-1
These are the colors and brand I like to use for weathering figures.

———————————————————————————————————

4-2
You can apply your paints separately or mix them together. Before you start painting you need to really dilute the paint with paint thinner. You just want a very watery thin base coat. If your application is too dark, just wipe it off with a cotton swab.

———————————————————————————————————

4-3
Work over the whole piece with diluted brown/black paint. Be sure to get into the crevices until he looks something like this.

———————————————————————————————————

4-4
Next, we start working on our rust technique.
I used brown and a piece of sponge. Different sponges will give you different texture.

———————————————————————————————————

4-5
You’ll want to cut the sponge shape sharp.

———————————————————————————————————

4-6
Get a dab of your paint on the tip of the sponge. Wipe off the excess with a cloth. You won’t need a lot of paint.

———————————————————————————————————

4-7
Very lightly press the sponge to your figure using mainly the edge. The idea is to capture the tiny splotches on the sponge and not a solid mark.

———————————————————————————————————

4-8
Apply your “rust” as you see fit. Check out reference photos to see where rust my creep up on a robot or machine. Rusting near joints and grooves would be common as well as any are that might be consistently splashed from the ground.

———————————————————————————————————

4-9
Here’s bertie with just one layer of weathering complete. Not bad?

———————————————————————————————————

Next up the final piece of the puzzle!

Part 5 :Weathering-2

We’d love to hear from you and check out what kind of customs you’re working on! Send us a shot of your latest custom work with a brief description to radtoyreview@gmail.com. 

Hit us up on Facebook or Twitter pages to stay updated whenever we post new Workshops and epic toy reviews!

Until next time!

.

.

.

.

.

.

.

.

.


THE WORKSHOP – DIY Mini Bertie Custom (PART 3 of 5) by markovengine

SDCC delayed our Workshop posts. Today we continue with part 3 of our 5 part tutorial series by markovengine! Part 4 is coming very soon as well!

If you need to catch up:

Part 1 – DIY MINI BERTIE CUSTOM PAINT TUTORIAL

Part 2 – PAINT BODY AND CREATE DECALS

Enjoy!

– Knives

———————————————————————————————————

PART 3 : “PLACING DECALS!”
———————————————————————————————————

3-1

There’s a couple different ways I like to apply decals.

You can apply your decals directly to your bertie’s surface using printable fake tattoo seals. This works well, but requires a little guess work as to how your decal will actually look on the surface after it’s laid down. To make it a little easier to get the exact placement, you can put the tattoo seal on a clear decal sticker before you apply it.

Left : Tattoo seal pack front.
Center : Tattoo seal pack back.
Right : Clear decal sticker pack.

———————————————————————————————————

3-2

Since techniques can vary depending on the type of printable tattoo sheets and clear decal stickers you have, so read their instructions!
Make sure you print your tattoo decals in reverse – (words should read backwards on sheet) Left to right, right to left so that when you apply them they will read the correct way.

Left : Decals printed backwards on tattoo sheet.

Right: Clear Adhesive sheet

———————————————————————————————————

3-3
If you’re not worried about fine tuning or adjusting your decal after you place it, you can apply the tattoo decal directly to your figure.

Left : Cut the tattoo seal to the right size. In this case, the upper arm.
Right : I peel off the transparent sheet and apply the adhesive part decal down.

———————————————————————————————————

3-4
Left : Wet the base of the tattoo sheet with water.
Right : After a certain time (read tattoo sheet’s instructions) base sheet may be separated.
Your tattoo/decal is applied!

———————————————————————————————————

3-5
If you are unsure and want a little more flexibility in your decal placement you can use the clear sticker sheet to help out
Left : Cut the tattoo seal to size
Right : Put decal down on clear sticker sheet.

———————————————————————————————————

3-6
Left : Wet the tattoo sheets base with water.
Right : Remove the base sheet after a set time (read tattoo sheet’s instructions).

———————————————————————————————————

3-7
Left : Carefully cut the decal. Be careful as the surface is not protected.
Right : Apply your decal like a sticker.

Easy peasy.

———————————————————————————————————

3-8
Here are examples of the complete decals. I used a mix of direct and indirect application.

———————————————————————————————————

3-9
After all the decals are set, I used an airbrush to apply a clear gloss in order to protect the surface.

———————————————————————————————————

3-10
Now our mini bertie is ready for some weathering!

———————————————————————————————————

Continues to Part 4 : “Weathering-1”

We’d love to hear from you and check out what kind of customs you’re working on! Send us a shot of your latest custom work with a brief description to radtoyreview@gmail.com. 

Hit us up on Facebook or Twitter pages to stay updated whenever we post new Workshops and epic toy reviews!

Until next time!

.

.

.

.

.

.

.

.

.