THE WORKSHOP – WWWETWORKS “SHIRT DECALS”

WWWetworks is back with another great tutorial for The Workshop. Carlo breaks down the step by step process on getting your own pimp decals laid down on some tiny cotton T’s (or undies, jorts, tube tops, etc..)

Enjoy!

– Knives

PART 1: PREPARATION

Ok first you have to choose the image that you would like to put as a decal, in my case I found an image of lasstranaut and make sure that it’s above 500px so your image will be crisp and detailed.

Once you have an image ready, you will have to edit it in Photoshop by cropping the picture. In this example, I managed to separate the image and added a black background, so why black? because the shirt that I will be using is black, you should always remember to use the color of the shirt, etc. red shirt = red background. This is crucial especially if you have a very complex and small image with a lot of details. In this case I didn’t have to cut away all the inner parts of the picture because it already had a black background. Convenient and makes the process much easier. Once you’re done adjusting, just save it out as a jpeg or tiff.

Ok, in the next step you will need to measure the area on the shirt on which you will lay down the image, in my case its 6cm x 9cm.

Now open Illustrator and draw a box with a 6cm x 9cm measurement and place/import the image into the workspace.

Scale down your image and place it inside the square, the square is your guide so make sure your image does not exceed the given area.

Now you’r ready to print. There are two types of iron-on papers, light for light colored fabric and dark for dark colored fabric. In this case, I printed the image using transfer paper for “DARK” fabrics. Make sure you set the paper quality to “BEST” to get a high grade print.

Now you’re decal is ready to be applied.

PART 2: APPLYING THE DECAL

Now that you have your decal printed out, cut the black background leaving at least a 1mm margin.

This is another critical part because most folks don’t know that you have to peel the back of the paper before ironing it into the shirt

Position your decal carefully and grab a piece of onion skin paper (most iron-on papers come with this inside their pack).

Put the onion skin paper above the decal and set the dial of your iron to “cotton”.

Once the iron is ready, press it against the onion skin paper for a maximum of 10 seconds. Make quick presses to the sides and be careful not to burn your decal.

This is what it looks like with the onion skin paper after ironing. CAUTION! VERY IMPORTANT! DO NOT TAKE THE ONION SKIN PAPER OFF THE SHIRT WHILE IT’S HOT!!

Allow it cool down for a few minutes and you will see that the paper will actually start to detach from decal pretty easily.

Now you’re done! Here is the final piece, I added an acrylic wash to the decal and some weathering to help blend it in with the rest of the figure. I hope you enjoyed this tutorial, cheers!

Custom TK by wwwetworks

Custom TK by wwwetworks


Thank you Carlo! New Workshop tutorials soon! Follow us on Twitter and like us on Facebook to stay updated!

This Monday

This Monday, we have another fantastic tutorial for The Workshop from customizing ninja WWWetworks! Don’t miss it!

Artist Spotlight – Chris Moore of “We Become Monsters”

Today’s a pretty exciting day. We have our first Artist Spotlight post featuring Chris Moore of webcomemonsters.com. I want to thank Chris for taking the time to do this interview and for sending a skelechub for me play with! Don’t leave just yet, but do check out Chris’online store where you can grab one of his gruesome creations AND save a little money with the coupon code 2012die now through the end of January. 

– Knives

Let’s kick things off formally, tell the world your name and a little about yourself.

C – Sure, my name is Chris Moore. I’ve done art in some form or another pretty much all my life. My training and degree was centered around industrial design, prop construction, and makeup FX.  I currently work 8-5 doing tech work for a huge corporation, then come home and try to cram in 4-6 hours on toys. Luckily I have a very supportive wife!

I have one of those too, don’t know what I’d do without her. How long have you been making your own toys and what started you down that path?

C – I guess I really started making ‘stuff’ while living in Los Angeles. I had been there for a few years, didn’t really do much in the way of FX work, had not worked on my portfolio and generally didn’t touch art anymore outside of some doodling. I had always collected toys to some degree and then stumbled upon some Medicom Freddy Kruger and Alien Real Action Hero at a toy store. Well holy shit – I couldn’t believe there was an old school Gi Joe style Freddy and Alien doll. Keep in mind this is before Hot Toys, or even BBI / Dragon, as far as I am aware. From there I got into 1/6th a bit, and my other big toy love, Chogokin. I don’t care for anime but give me some brightly colored goofy looking robots and I’m a happy guy. Anyways, back to 1/6th, I loved that Freddy, nobody was making zombies at the time, so I made myself a few for my collection. I think I have something like 30 now, packed into 2 shelves of a Detolf. I needed a horde, and I wanted them unique. I dabbled in this fashion for years, just creating for myself. Over the years people had continually asked if I sold them and my response was always ‘Well then *I* wouldn’t have them anymore, so what is the the point?’ I had no desire to share my stuff if I didn’t get one – these were all made for me. Someone eventually directly asked for a commission, and it was hard to argue that – I’d be making it from day one for someone else, so I wouldn’t have any feeling of loss as the toy was never ‘mine’. Odd distinction, I know, but it was a requirement for me, for whatever reason. After that and getting into buying other indie toys, I saw that the process used for these small run resin toys were exactly what I went to school for, and then something clicked – I can use the skills I already knew to make my own stuff, keep it, AND share it with other people. I sold a bunch of my collection, bought some equipment and started working around July of 2011. First release was December of that same year.


Can you talk about your technique at all? Your Process? Do you do all the creations yourself beginning to end?

C – I do make them from beginning to end. A few started with a sketch – something I want to try to force myself to do more often as it helps you sculpt faster if you are not designing on the fly. Basically, I sculpt in Magic Sculpt and Sculpey Firm, depending on what I’m working on. Then I make my mold out of Silicone and start casting. I are just about done with a pressure tank setup as well, so no more wasted resin trying to get bubble free pours, and I should be able to do crystal clear resins and use some fun additives (GITD, Color changing, beads). Once the Casting is cured, I demold and do some clean up with a knife – nearly took my thumb off in October doing this, which delayed series 1 to December. After demolding and cleanup, the pieces need washed of mold release and then once dry, painted. I really do want to do some collaborations as well, though.

Where did the idea for your creations come from, what’s their story? 

C – I’m no writer, so there isn’t much of a storyline to them. I just like monsters. I guess it’s more of a Secret Base thing, where it is just a slew of weird creatures, than a Three A thing, where there are comics providing a backstory.  I can be somewhat self-critical, so I think this may be a safety mechanism – if I grew to dislike a backstory, no matter how happy I was with the figure, I’d grow to hate the actual toy. I’m much less confident in my writing than in my more physical art skillset. I think a story would make them easier to market in some ways, but I’m terrible at self promotion and have plenty of other areas to improve there without the additional issues I’d give myself trying to tie these guys together or flesh out why or how a fat skeleton slug thing can even exist. I’ll leave that up to the owners.

How many different varieties of monsters do you have currently in production?

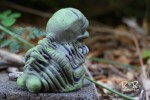
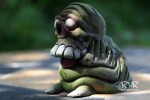
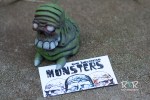
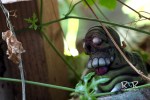
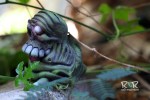
C – Produced and in the store, we have Skelechub, Skellafella, Footlie, Stumple and Birddog. Currently in production for Series 2, I’ve got a new variation of Skelechub (new sculpt) a budget figure named Ghasp, and 2 others.

Where do you hope to see “We Become Monsters” in say, 10 years? What are some aspirations/plans for your future toys?

C – I’d love to quit my day job, but if that can’t happen in 10 years or ever, I’ll keep going. I’d *REALLY* like to do some sofubi style vinyl stuff but the barrier to entry is way too high for me right now, cost-wise. So what I’m doing is sticking with resin, for now, and experimenting with materials and articulation. I do feel there has to be a garage castable material out there somewhere that could be close to vinyl – I need to grab a new Burman Foam catalog and dig around a bit. I may take a stab at glass or concrete work as well – a combo of those with the cold cast metals I’m already using could allow for some interesting higher tier pieces.

What other designers/artist are you inspired by?

C – Whew, I’m going to miss a ton, but here we go: Secret Base, Gargamel, Super 7, Pushead, October toys, We Kill You, Monsterforge, H_X, Plaseebo, Defiance Speed, Emily Slade, Dave Webb..

.. and anyone I ever see making resins or customs and trying to get them out in the wild. There is so much amazing work out there. Almost everyone is super helpful too – best two tips for anyone thinking of trying this is ask for help – you will get it, and WEAR A RESPIRATOR.

Indeed! OK, changing gears a little.. Star Wars or Star Trek and Why?

Star Trek, original series. It is timeless and always hilarious. Seriously, it is amazing comedy. I like SW just fine, it just is not funny and comedy always wins.


You get one super power for a single day, what would it be and what would you do while you had it?

This is rough, I’d want a package option, picking just one is hard. I’ll go with teleportation, just for the cheap travel and awesome toy shopping and food in other cities. I love Tokyo, so eating lunch there everyday would be awesome.

Me, I’d have chosen the power to print money… and bacon.

Chris, it’s been fun. Thanks for your time and for sending me a Skelechub to play around with. Where can folks go if they want to procure one of your creations themselves?

The website, www.webecomemonsters.com has official release information and the store, for anyone who wants to see updates and WIP pics, they can find me on facebook at http://www.facebook.com/WeBecomeMonsters . Finally they can also follow us on twitter at @webecomemonster.

The Workshop – Jim Bailey’s “Custom Action Portable Negra/Blanco TK”

This continues our “The Workshop” series. We hope you enjoy this one and check back soon as we have many more on the way.

Jim Bailey, aka Grindhouse is today’s Workshop master. An architect, painter, kit-basher, and games designer, Jim’s got his hand’s in quite a few different creative pies… and boy do we like pie!  

Almost as much as we like to learn cool new techniques to push our customs and creations further. Thanks Jim!

–  Knives

Custom Action Portable

Sometimes I get an idea that so totally overwhelms me that I’m like a zombie all day at the office and only come alive when I get home and start working on it. As I was finishing this project last night, I realized that I had killed a 12 pack of beer and a few shots of whiskey and was so engaged in the work that I didn’t notice.  Zombie effect today not caused by excitement about project!

Custom Action Portable TKs! These are the first three of five that I have planned. Blanco and Negro ares super duper easy. You CAN try this one at home. What follows is a fairly detailed step-by step for Negro and then some narrative description of how I did Blanco and Interbaka.

Negro:

Custom Negro TK

1. The components you need are a Noir Deplume (minus feet, hands, pistol, head, and hose) as well as feet, hands, head, and swords from a Yellow Jacket.

what you need

2. Carefully unscrew wrist screws part way to remove Deplume hands. Screw back in while working then unscrew later to put the final hands on. Do not force. You will break the joint.

unscrewing the arm

3. Spray all the components from the Tomorrow King with flat black. Use Krylon or Citadel.

spray it down

4. Remove boots, head, hose, gun/holster form Deplume

de-ccessorize

5. Remove Deplume shirt, turn inside out, and carefully remove the stitching that holds on the long right sleeve. Use Xacto knife or razor blade.

removing the sleeve

6. Fold back edge of sleeve and sew to match left sleeve. It won’t be an exact match but close enough for government work.

matchy matchy

7. Get the trousers to fit how you want by folding the cuffs up inside and sewing a stitch or using a little piece of double stick tape. You can cut to length instead but that requires hemming and limits future options. Soak the trousers in water when they are in place to make them wrinkle and conform to his body in the manner you wish.

work pants

8. Paint Feet and hands with a latex satin black paint such as Citadel Chaos Black or Liquitex Mars Black. No cheap craft store paints! To chalky and/or grainy.

9. Mix a dark gray of your liking.

10. Paint the hair.

silk and smooth

11. Mix one part gloss varnish to four parts black paint.

12. Paint the face with this mix.

paint the face

13. Final components, ready for assembly and posing! Note that the sword and sheaths have flat black spaypaint as their finish application.

all the pieces in place


Blanco:

Blanco TK

Get yourself a DIY Deplume and carefully unstitch the sleeve. Get feet, hands, swords, and head from a Yellow hornet and spray with Krylon flat white. Then take white acrylic paint and mix 4 parts to 1 with an acrylic gloss varnish. Paint face, hands, and feet with this blend. This step differs from the Negro process. Leave the hair and swords as Krylon flat white.

Interbaka:

Interbaka

Action Portable Interbaka is another kettle of fish and should not be attempted by the faint of heart. I used a Hatchery Guard as the base along with swords from a Yellow Hornet. The power pack is from  AP Jungler Dropcloth. The grenades are a little small because they are 1/18 scale: acquired from Marauder’s Gunrunners.

I hadn’t sewed anything since about 1978 so I was a bit daunted. I sewed up the sweatshirt  and bandana out of material from one of my old t-shirts. I then created a makeshift light table and traced the art that I had pieced together and warped out in photoshop using a .05 Staedtler Pigment Liner with waterproof archival ink. It bled a little but not too bad. I then created the webbing by sewing up scavenged bits and clasps from other action figures. Next, I bleached and repainted the Hatchery Guard trousers. The hair was then  sculpted using Plastruct plasticard and Kneadtite “green stuff”.  To do the electrified swords, I added a couple of plastic bits to the back pack and drilled holes. I then drilled two holes in each sword: one at the pommel and one on the handle. I then threaded guitar wire through it all and tied it together with pliers. The wire floats free inside the backpack so all the bits can be easily removed for posing, etc. Finally, I painted it! That’s an article in itself. I may do an article on weathering, wipes, and rusting one of these days.

Enjoy

Jim Bailey aka Grindhouse