We continue with part 4 of our 5 part tutorial series by markovengine!
If you need to catch up:
Part 1 – DIY MINI BERTIE CUSTOM PAINT TUTORIAL
Part 2 – PAINT BODY AND CREATE DECALS
Enjoy!
– Knives
———————————————————————————————————
Part 4 : WEATHERING
———————————————————————————————————
4-1
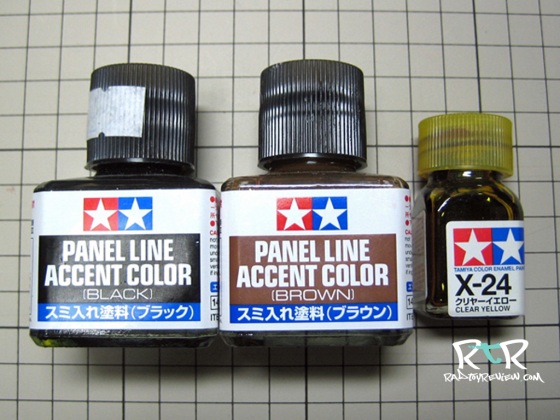
These are the colors and brand I like to use for weathering figures.
———————————————————————————————————
4-2
You can apply your paints separately or mix them together. Before you start painting you need to really dilute the paint with paint thinner. You just want a very watery thin base coat. If your application is too dark, just wipe it off with a cotton swab.
———————————————————————————————————
4-3
Work over the whole piece with diluted brown/black paint. Be sure to get into the crevices until he looks something like this.
———————————————————————————————————
4-4
Next, we start working on our rust technique.
I used brown and a piece of sponge. Different sponges will give you different texture.
———————————————————————————————————
4-5
You’ll want to cut the sponge shape sharp.
———————————————————————————————————
4-6
Get a dab of your paint on the tip of the sponge. Wipe off the excess with a cloth. You won’t need a lot of paint.
———————————————————————————————————
4-7
Very lightly press the sponge to your figure using mainly the edge. The idea is to capture the tiny splotches on the sponge and not a solid mark.
———————————————————————————————————
4-8
Apply your “rust” as you see fit. Check out reference photos to see where rust my creep up on a robot or machine. Rusting near joints and grooves would be common as well as any are that might be consistently splashed from the ground.
———————————————————————————————————
4-9
Here’s bertie with just one layer of weathering complete. Not bad?
———————————————————————————————————
Next up the final piece of the puzzle!
Part 5 :Weathering-2
Hit us up on Facebook or Twitter pages to stay updated whenever we post new Workshops and epic toy reviews!
Until next time!
.
.
.
.
.
.
.
.
.


Super awesome! I love it!
LikeLike
What sort of sponge are you using in this particular example?
LikeLike
I’m not really sure what sort it is.. I can try and ask Markovengine about it.. but from the looks of it, it appears to be pretty standard. You can use a variety of sponges to achieve different effects in your weathering..
LikeLike
I’m just curious because I’ve had trouble finding a good sponge to make that sort of effect. It may have to do with the amount of paint I’ve been applying, but it could also be that the sponges I’ve been using don’t have a fine enough texture. If you wouldn’t mind asking him, I’d love to hear a little more info.
LikeLike
No problem Neil! I’ll shoot him an email and find out as much as I can 🙂
LikeLike
Neil! So I heard back and he says that the sponge he uses is just a common generic dish sponge in Japan. No special brand, etc…
LikeLike
Interesting, the generic sponges in Japan must have a much smaller grain to them than the ones in the states. I’ll have to keep hitting art stores and experimenting with sponges then, thanks anyways!
LikeLike